It’s hard, isn’t it?

You want to increase website traffic.
You block time when your little one is sleeping to write some awesome blog posts that you totally know will get you traffic. You write it, edit, look over it, create the best Pin graphic and hit publish.
Crickets…
Nothing.
What is going on? If you just started a blog and want to get more traffic to it, then this easy peasy tip will totally help you out. It did for me, and my blog isn’t even a year old.
Don’t be wrong, I’ve been trying to grow my traffic and used other things like this and this, but for a while my traffic has been slow and steady. Which is great! Every day I get more traffic, but it’s not that much.
So, the more and more tips I use totally helps me bump my traffic up each month. And this little trick – I started just in the new year – and I can already tell it’s working.
But first, let me tell you a little bit about what Google likes.
Google Likes Fresh and New Content
Of course, you must know that right? But, what about all your old posts on your blog? Does Google like that? Well not really. It’s an old post with old screenshots and information so it may not get as much traffic to it anymore. And in Google’s eyes, it’s not relevant anymore.
Unless, of course, you have a popular blog or a popular blog post. For example, when I searched, “how to grow your social media following” in Google, the first result is a post from 2014…but it’s from Forbes.
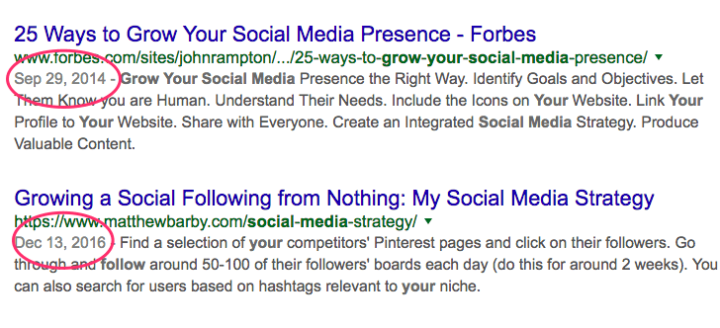
Google believes this post from 2014 is the BEST answer to my question even though it’s outdated. This post probably has some great SEO juice and relevant tips that still holds water in 2017. And, it probably gets a lot of traffic every day.
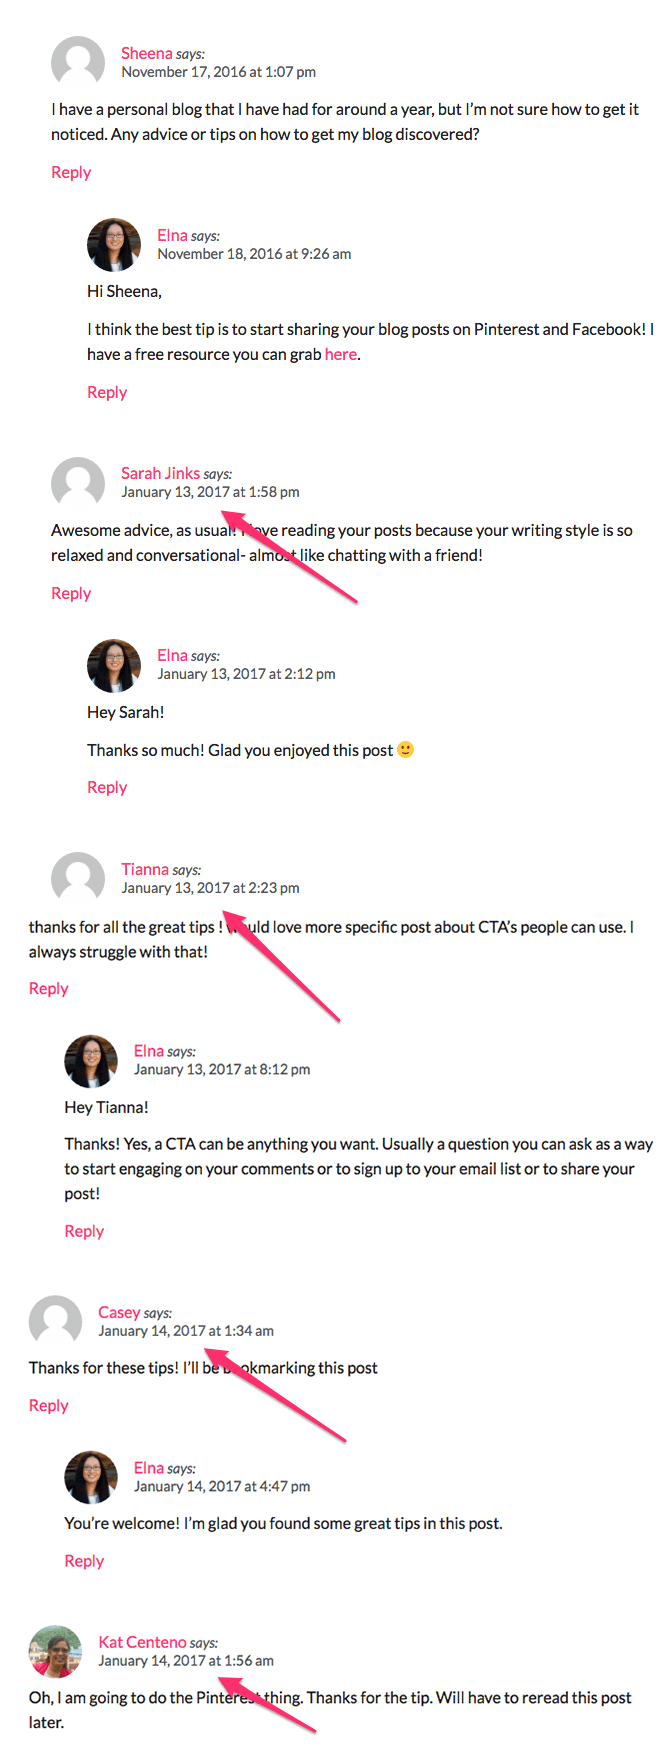
On a smaller scale, when I used this traffic tip I’m going to share today, I noticed within a few days people were reading old posts and commenting on them!
For example, this post was published on April 26, 2016, and one of my last comments was in November. But, with this new tip, I got a few more comments, meaning that new people were visiting my old post!
So, how can we extend the life of old posts without spending hours and hours revamping them?
The One Easy Thing That Boosted My Traffic
Want to know what it is?
It’s using the last modified date on my blog posts. So, instead of it saying the original published date, it says, “Last Updated 1/3/2017” or whatever date you last updated your post.

And you know what that looks like in Google?

It looks like a new post because of the *new* date! And we all know Google likes fresh and new content. BOOM!
How to Show Your Last Updated Date on Your Posts
The tutorial I’m going to show you is for any Genesis WordPress theme. I’m sorry SqureSpace bloggers or WP bloggers on another theme. This trick can be done on those platforms, but for the sake of this tutorial and the fact that Genesis themes are totally popular nowadays, it just makes more sense to stick to one way.
One other thing, if you search this trick you might notice there are some WP plugins that will handle this thing. I’ll show you the OTHER easier way – but still give you a plugin at the end of this tutorial if you like using plugins.
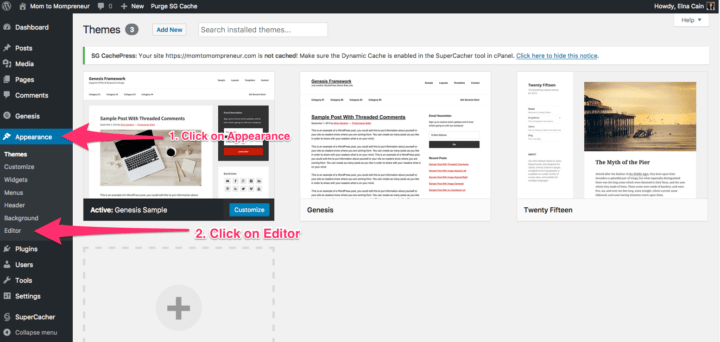
1. Click on Appearance and then Editor
When you log in to your site, find and click on Appearance and then click on Editor.
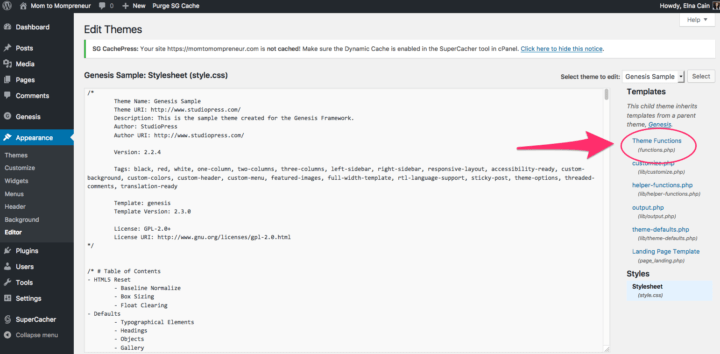
2. Click on Theme functions on the sidebar
After you click on Editor, you see your CSS Stylesheet. On the right-hand side bar, click on Theme functions.
3. Time to Get Your Coding Skills On
After clicking on Theme functions, scroll down in the Editor window until the end. Then copy this code and paste it at the end of the Editor window.
NOTE: start copying from line 4 at “add_filter” OR click on “view raw” and copy from there.
Don’t copy the <?php. Copy the code below started on line 4
Once you copy the code, insert it at the bottom of your Editor window.
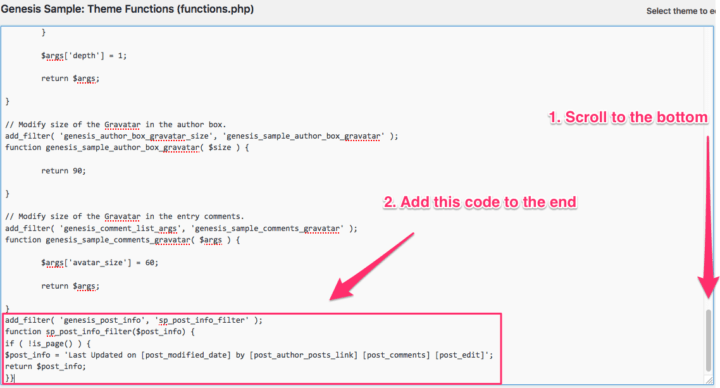
Tips:
- Don’t mess up any of your code like erase a } or something similar!!
- Don’t worry about spaces; just scroll to the bottom, and after that last } put your cursor under it and paste!!
- You might have to add: “Last updated on [post_modified_date] ” in the Simple Edits sections to make this work!
4. Click on Update
Don’t forget to click on update file.

That’s it! You now have the modified date on each of your posts!

If you’re not comfortable adding code to your theme, then the Genesis Simple Edits plugin will let you accomplish the same thing.
Here’s a video tutorial to help you out even more!!
Some Points to Remember When Using this Traffic Tip
Now, I know this can be fun going to all your blog posts and changing a word or two just so your modified date is updated, but be careful.
Google doesn’t like to be hoodwinked. When you update your post, it has to be substantial. This means adding new content, fixing errors or updating certain parts and adding new screenshots.
For example, since I made a post about starting a blog, I started adding this link as well as a couple of sentences to explain about it on each relevant old blog post.
For me, I like to go into old posts and just review my text. I often notice grammar errors, and while I do want to fix them right away, I have to remember that when I do, it will update my post so I have to think about what else I can update on that post. If nothing else, it forces me to revisit my post and add something useful – there is always something new you’ve learned that you can offer to your readers.
Get Ready to Increase Website Traffic!
After you updated your blog posts and scheduled them in Pinterest with Tailwind, you’ll notice hopefully more Google traffic to older posts. Not necessarily because your ranking has changed, but because your SERP clickthroughs should increase due to the fresh content date.
I’m getting a ton of more comments on old posts (that I’ve added new content to). So, what are you waiting for, get your nerd glasses on and try some coding on your WP blog and have fun 🙂
Tell me in the comments how using this simple trick is growing your blog mamas!
UPDATE: If you don’t have a Genesis them and still want to use this trick, just post in the comments what you’re using for your site and I’ll see what I can do to help!


109 Comments