Spring always gives me that itch to make something with my hands.
The snow melting and bits of grass and new flowers popping up always brings a smile to my face when I work from home.
As soon as the days get brighter, I start wanting to pull out fabric, clean off the table, and create gifts that feel thoughtful instead of last minute.
I love giving something handmade, but I also know my limits.
I need projects that fit into real life, not crafts that take weeks or leave my kitchen looking like a fabric explosion.
Store-bought gifts always feel rushed to me, but half-finished craft ideas sitting in bins feel just as frustrating.
I wanted ideas that feel special without being overwhelming, projects I could actually finish and feel proud to give.
And fabric crafts are something I love making.
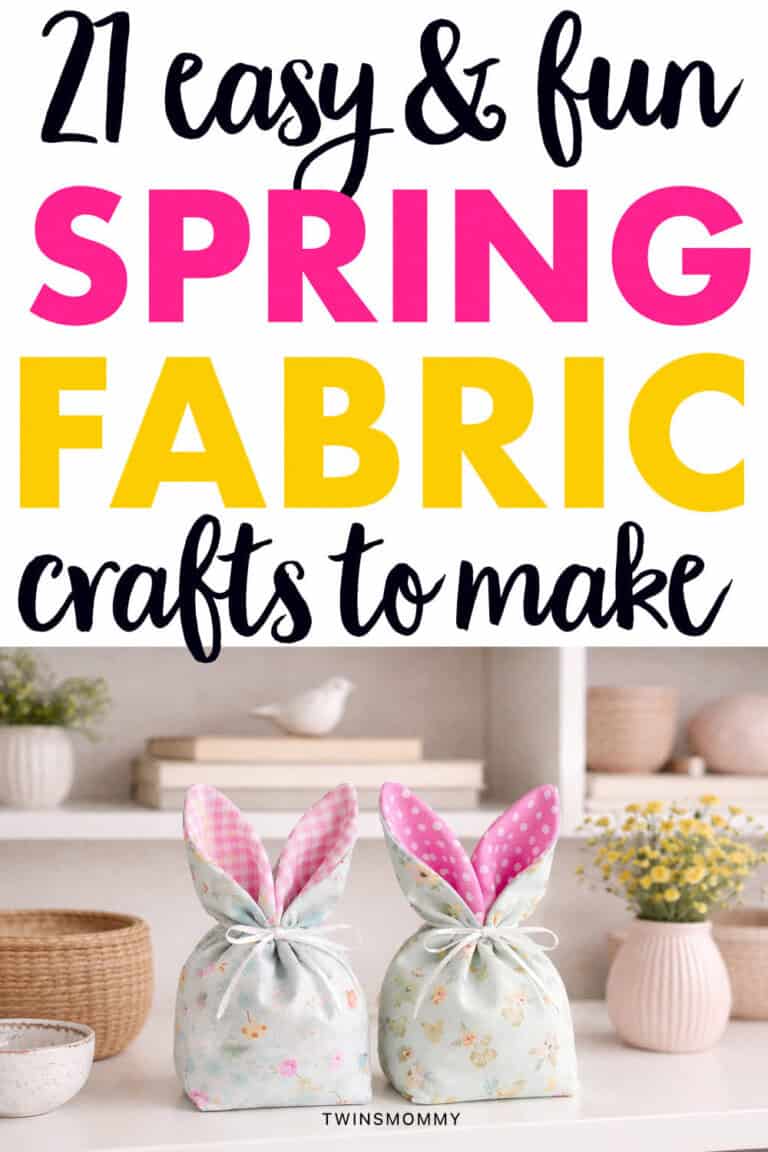
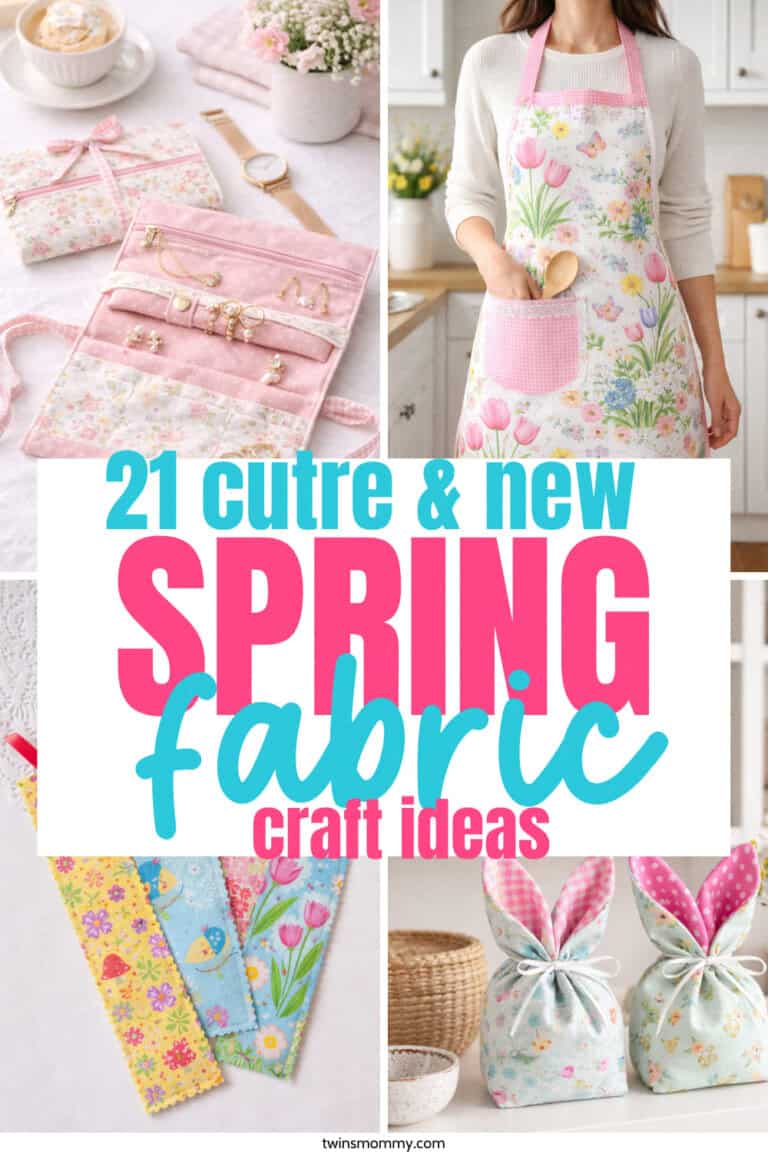
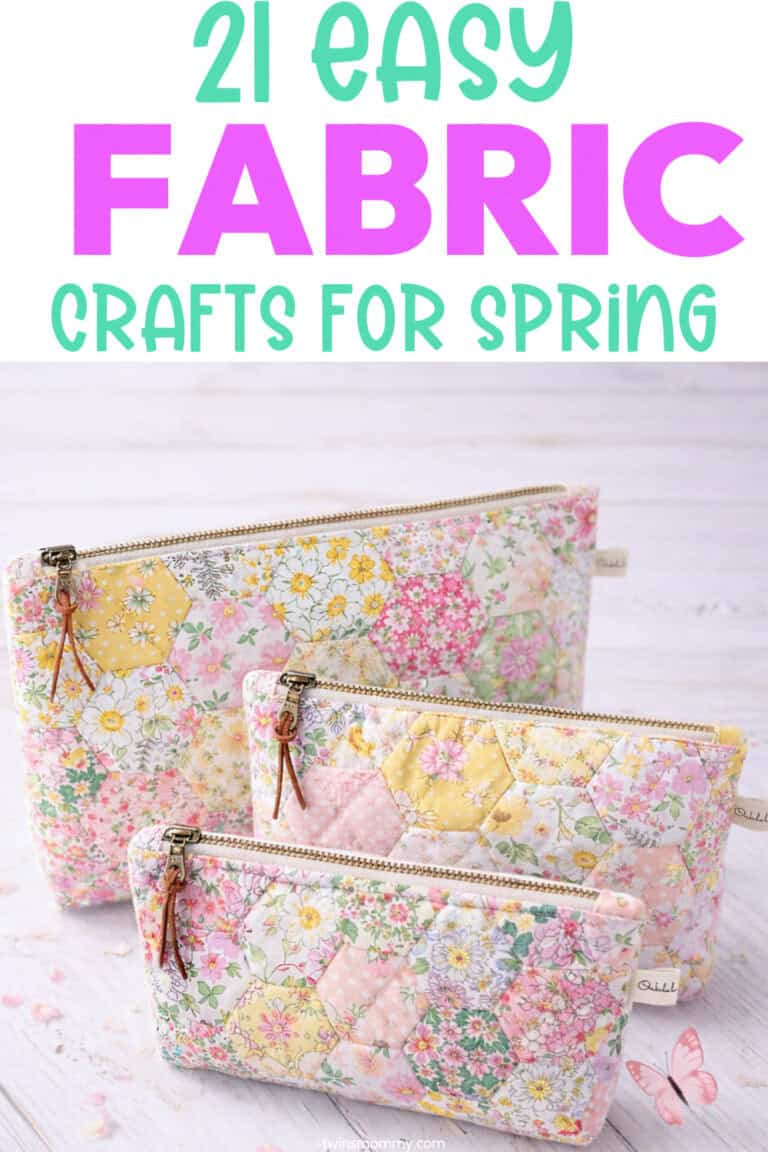
That’s why I put together these 21 spring fabric craft ideas.
Every one of these works as a gift, feels fresh for the season, and is truly doable.
You’ll walk away with ideas you can sew, stitch, or assemble without overthinking it, and actually enjoy the process along the way.
Cute Fabric Crafts for Gifts (or to Sell)
Intro
What You Might Need
- Cotton or linen fabric in spring colors (I like these vintage patterns)
- Fabric scissors or rotary cutter
- Sewing machine or needle and thread
- Iron and ironing board (I like the small ironing board for these crafts)
- Basic notions like pins, elastic, and ribbon
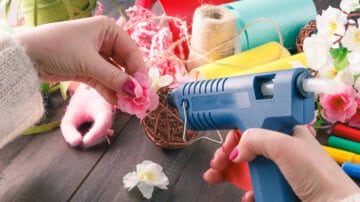
1. Fabric Flowers (Tilda Tulips) in a Jar
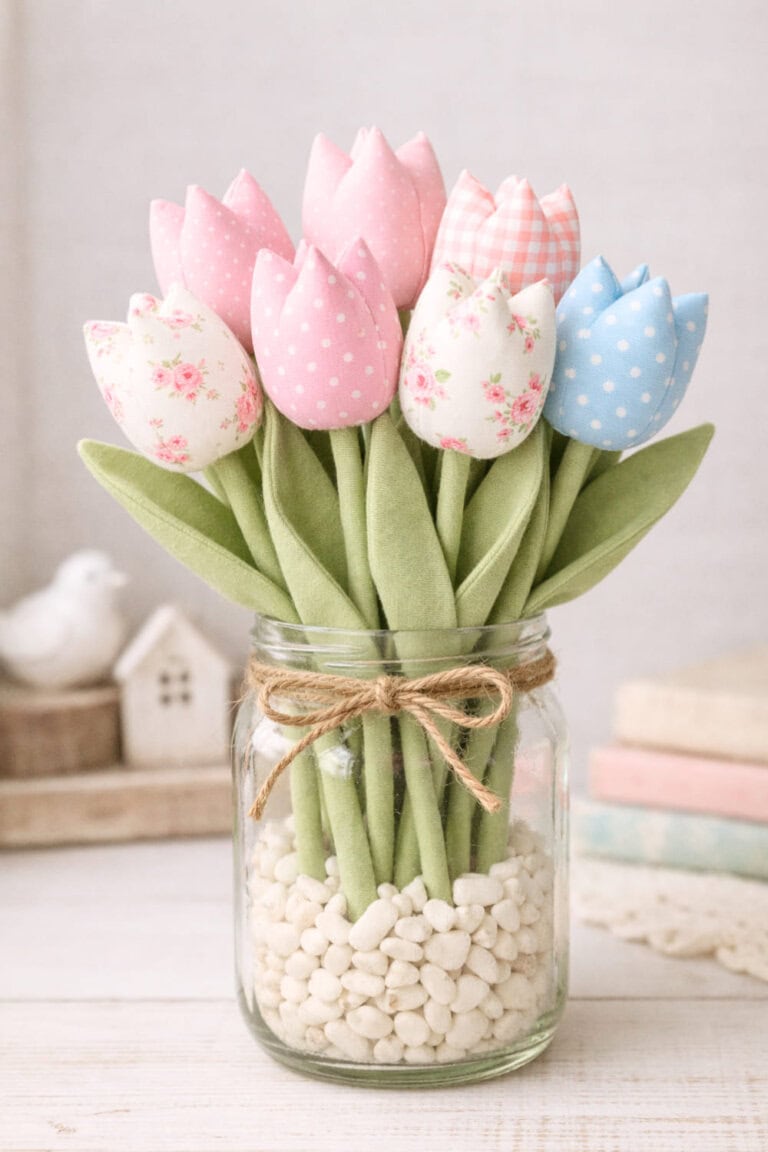
This craft works well as budget-friendly decor, a seasonal centerpiece, or even a thoughtful handmade gift. You can mix prints, keep the color palette neutral, or go full spring with florals and gingham. Once finished, they last year after year—just tuck them away and bring them back out when spring rolls around again.
Materials
- Cotton fabric scraps (pastels/prints) for tulip heads
- Green fabric (cotton/linen) for stems + leaves
- Matching thread
- Stuffing (polyfill)
- Wooden skewers, floral wire, or thin dowels (for structure)
- Hot glue gun or fabric glue (optional, for quick assembly)
- Jar or mason jar
- Pebbles/dried beans/floral foam (to hold stems)
- Twine or ribbon (optional)
Tools
- Scissors (or rotary cutter + mat)
- Sewing needle or sewing machine
- Pins or clips
- Turning tool/chopstick (to flip fabric right-side out)
- Cut tulip pieces: Cut 2 tulip head pieces per flower (simple rounded tulip shape).
- Sew the head: Place right sides together, sew around edges, leave bottom open. Clip curves.
- Turn + stuff: Turn right-side out. Lightly stuff so it’s firm but still soft.
- Close the bottom: Fold raw edges inward and stitch or glue closed around the opening (or leave slightly open if you want to insert the stem tip inside).
- Make the stem: Cut a long green rectangle. Wrap it around a skewer/wire, sew along the long edge to make a tube. Turn right-side out and slide the skewer/wire inside.
- Attach head to stem: Insert stem into the tulip bottom and stitch tightly around the base (or glue).
- Make leaves: Cut 2 leaf shapes per leaf. Sew around, leave a small opening, turn, press, and topstitch.
- Attach leaves: Stitch or glue leaves to the stem a few inches below the tulip head.
- Arrange in a jar: Add pebbles/beans/floral foam to the jar, insert tulips, and fluff the leaves.
- Finish: Tie twine/ribbon around the jar if you want.
Tip: Mix 2–3 coordinating prints (gingham + polka dot + tiny floral) for that “Tilda” look.
2. Reusable Fabric Gift Wraps
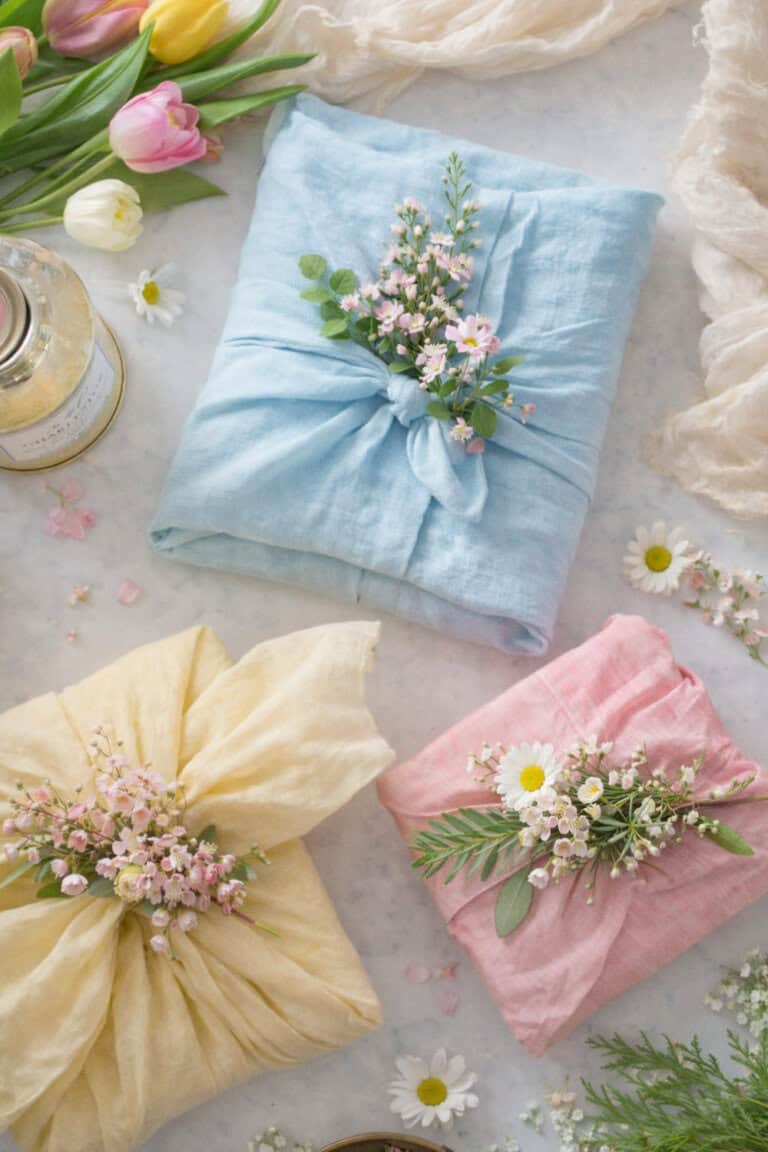
Here’s exactly how to make springy fabric gift wraps like the photo (furoshiki-style), plus a quick way to add the floral “tuck” on top.
Materials (what you need)
- Fabric squares (lightweight cotton, linen, or muslin)
- Small gift: 18–22 in (45–56 cm)
- Medium gift: 28–32 in (71–81 cm)
- Large gift: 36–40 in (91–102 cm)
- Gift box (or any stable item to wrap)
- Scissors + ruler/tape measure
- Iron + ironing board (highly recommended for crisp folds)
- Optional no-sew finish: pinking shears or fabric glue/hemming tape
- Spring embellishments (optional):
- Small faux flowers or fresh sprigs (daisies, baby’s breath, tiny blossoms)
- Twine, thin ribbon, or a small elastic
- A small tag
- Cut your fabric square
- Cut a true square (same width and height).
- Press it flat with an iron.
- Quick sizing tip: Your square should be about 3× the height of your box for easy tying.
- Place the fabric pretty-side down
- Lay the fabric like a diamond (one corner pointing up).
- Set your gift in the center
- Place the box directly in the middle of the fabric.
- Bring the bottom corner up over the gift
- Pull the bottom corner up and over the top of the box.
- Bring the top corner down over the gift
- Pull the top corner down to neatly overlap the first corner.
- Tie the left and right corners together
- Bring the left and right corners up.
- Tie a single knot first (snug, not too tight).
- Tie a second knot to secure
- Tie another knot on top (like tying your shoes, without loops).
- Adjust so the knot sits centered and the fabric looks smooth.
- Make it “spring friendly”
- Fluff the folds so they look soft.
- Use pastel fabric (light blue, blush, butter yellow).
- Add your flowers.
3. Spring-Themed Fabric Coasters
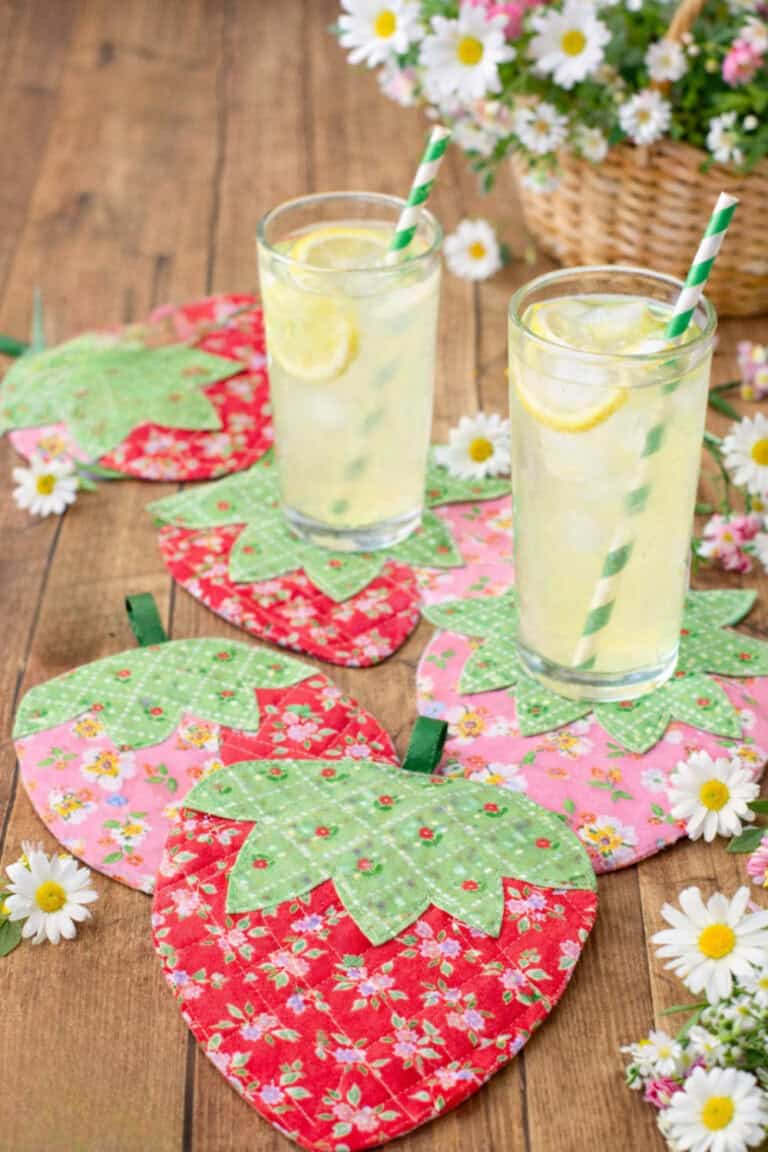
Check out these adorable cute strawberry coasters you can make for a teacher’s gift or to even sell on Etsy!
Materials you’ll need:
Fabric + structure
- Cotton quilting fabric (2–3 prints) for the strawberry front/back
- Green cotton fabric for the leaf “cap”
- Quilted batting (or a layer of felt) for the middle
- Optional: lightweight fusible interfacing (helps them hold shape)
Tools
- Strawberry coaster template (you can draw one)
- Scissors or rotary cutter + mat
- Pins or fabric clips
- Sewing machine (or hand-sewing needle)
- Thread
- Iron + ironing board
- Fabric marker/chalk
Optional extras
- 1/2″ ribbon for the little loop “stem” (or a fabric strip)
- Bias tape maker (optional) if you want a crisp edge finish
- Walking foot (nice for quilting, not required)
- Make a template
- Draw a strawberry shape on paper (about 5–6 inches tall).
- Draw a second piece: the leaf cap (a simple scalloped “crown”) that sits on top.
- Cut out both paper templates.
- Cut your fabric pieces
- Cut 2 strawberry shapes (front and back fabric).
- Cut 1 strawberry shape in batting (same size).
- Cut 2 leaf caps (green fabric).
- Optional: cut 1 strawberry shape in fusible interfacing and fuse it to the wrong side of one strawberry piece.
- Quilt the top (strawberry front)
- Layer the front strawberry fabric (right side up) with the batting underneath.
- Pin or clip in place.
- Quilt with simple straight lines (diagonal or vertical).
- Trim batting flush with the strawberry edge if needed.
- Make the leaf cap
- Place the two leaf cap pieces right sides together.
- Sew around the outer edges with a ¼” seam allowance, leaving the straight bottom edge open.
- Clip curves/scallops, turn right side out, and press flat.
- Optional: topstitch around the edge.
- Add the ribbon loop (optional)
- Cut a 2–3 inch piece of ribbon.
- Fold it into a loop.
- Baste it to the top center of the coaster with raw ends aligned to the top edge.
- Assemble the coaster layers
- Lay the back strawberry fabric right side up.
- Place the quilted front strawberry on top, right side down.
- Tuck the leaf cap between the layers at the top with scallops pointing inward.
- Tuck the ribbon loop inside.
- Pin or clip all around.
- Sew and turn
- Sew around the strawberry with a ¼” seam allowance, leaving a 2–3 inch opening.
- Clip curves and notches carefully.
- Turn right side out.
- Smooth edges and press.
- Close and finish
- Fold the seam allowance at the opening inward and press.
- Topstitch around the entire coaster (about ⅛”–¼” from the edge).
4. Fabric Bunny Scented Sachets
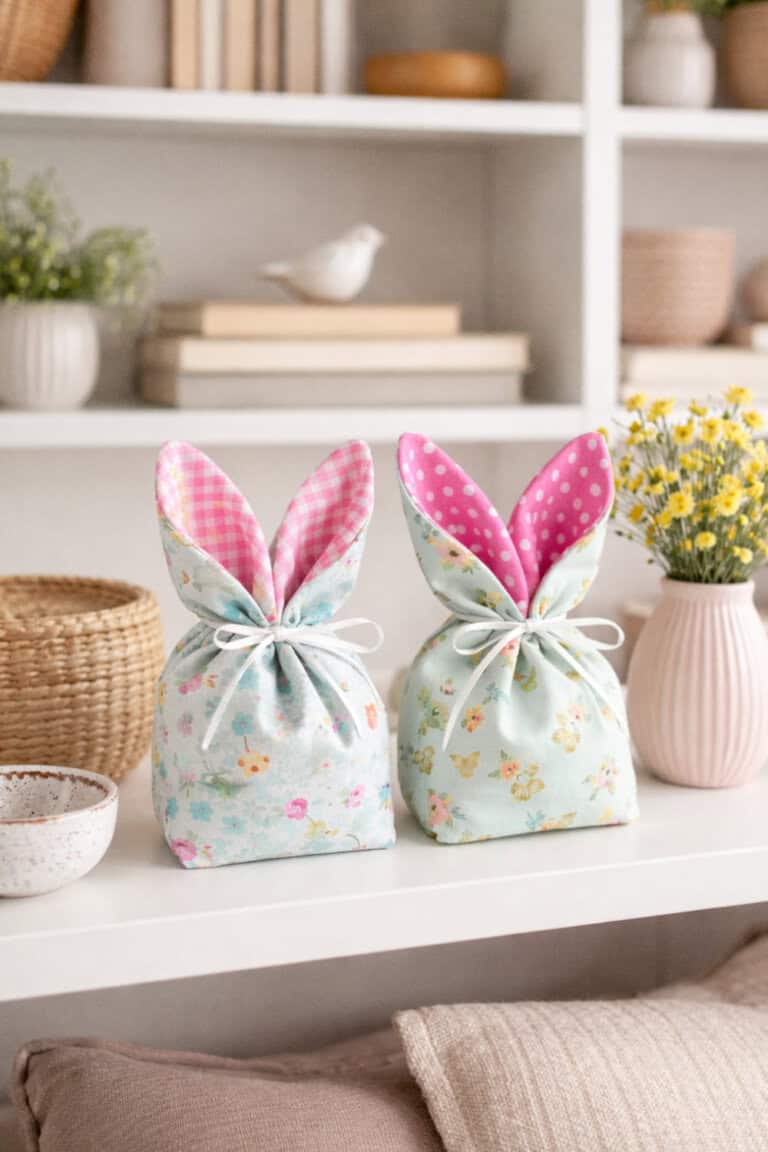
For some lovely scents in your life, why not make these cute little bunny sachets filled with lavender or whatever scents you want!
Materials needed:
- Cotton fabric (outer body) + cotton fabric (inner ears/lining)
- For one sachet: about 2 fat-quarter-sized pieces is plenty (you’ll have scraps left)
- Ribbon: 1/8″–1/4″ wide, about 18–24 inches per sachet
- Stuffing for scent (pick one):
- Dried lavender (classic)
- Dried rose petals, chamomile, lemon balm
- Cedar chips (closets/drawers)
- Optional fillers (to add weight + help scent last):
- Uncooked rice
- Flaxseed
- Optional scent boost:
- A few drops of essential oil (lavender, lemon, vanilla)
- Sewing machine or hand-sewing needle
- Fabric scissors (or rotary cutter + mat)
- Pins or sewing clips
- Iron + ironing board (helps a lot)
- Ruler or measuring tape
- Fabric marker/chalk
- Safety pin (for turning + pulling ribbon through)
- Optional: pinking shears (to reduce fraying), funnel (for filling)
Tip: If you want them to last longer and stay tidy, put your filling in a small muslin bag or tea filter first, then tuck that inside.
Cut list (1 sachet)
- Body fabric: 1 rectangle, 10″ × 8″
- Ear lining fabric: 2 ear shapes, about 3″ × 5″, rounded tip
- Ear outer fabric: 2 ear shapes, same size as lining
- Scale up as needed; keep ears about 60–70% of pouch height
Steps:
- Sew one outer ear to one lining ear (right sides together), leave bottom open
- Clip curves, turn right side out, press; repeat for second ear
- Optional: topstitch ears
- Fold top edge of body fabric 1/4″, press; fold again 3/4″, press; sew hem
- Place ears on top edge, 2–2.5″ apart, angled slightly outward; baste
- Fold body in half (right sides together); sew sides and bottom with 1/2″ seam
- Optional boxed bottom: pinch corners, sew 1″ across, trim
- Turn right side out
- Fill with 2–4 tbsp dried lavender and 2–4 tbsp rice or flaxseed
- Gather fabric below ears, wrap ribbon, tie bow
- Twist ears slightly so lining shows
Optional upgrades
- Add wood beads to ribbon ends
- Stitch in a small tag
- Hand-stitch ear bases so they stand up
- Add one drop vanilla oil to dried filling for stronger scent
5. Fabric Zipper Pouches
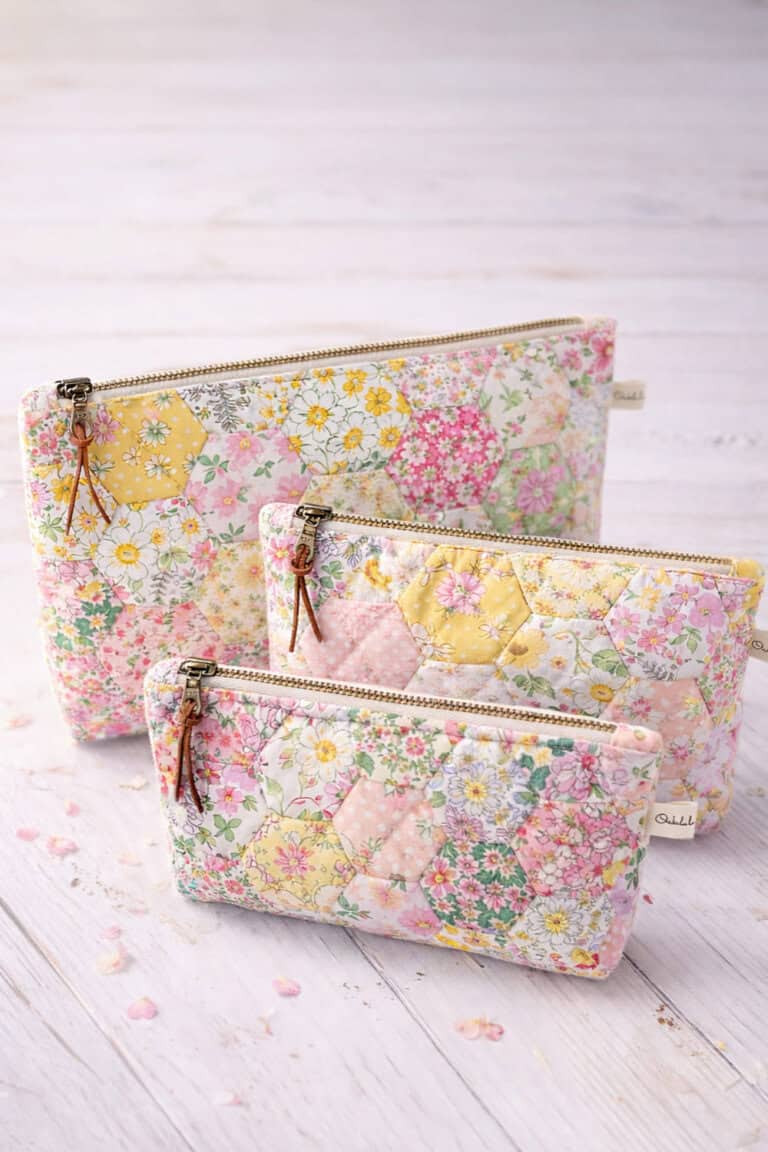
If you know someone who needs a little pouch for their makeup or for their pencils you can make this wonderful fabric zipper pouch for them easily!
Materials you need:
Fabric + stabilizers
- Quilting cotton scraps (spring florals, dots, solids) for the patchwork exterior
- Lining fabric (quilting cotton)
- Fusible fleece or cotton batting (for the quilted look)
- Lightweight fusible interfacing (optional, helps the pouch hold shape)
Zipper + notions
- 1 nylon coil zipper (9–12″ works for most pencil-pouch sizes)
- Thread (matching or neutral)
- Wonder clips or pins
- Fabric marker or chalk
- Seam ripper (just in case)
Tools
- Sewing machine
- Rotary cutter + mat + ruler (or fabric scissors)
- Iron + ironing board
- Zipper foot (helpful, not required)
- Hand sewing needle (optional)
Cutting (easy “pencil pouch” size)
You can change sizes later—this is a great starter.
Finished pouch: about 9″ wide x 4.5″ tall x 2″ deep
Cut:
- Patchwork exterior panel: 2 pieces, 10″ x 6″
- Lining: 2 pieces, 10″ x 6″
- Fusible fleece/batting: 2 pieces, 10″ x 6″
Optional for boxed corners: no extra pieces needed.
- Make the patchwork front (skip if using one fabric)
- Sew fabric scraps into a patchwork panel (hexies, squares, or strips)
- Press seams flat
- Trim into two rectangles: 10″ x 6″
- Quilt the exterior
- Fuse or layer fusible fleece/batting to the wrong side of each exterior piece
- Quilt with simple straight lines (diagonal or horizontal) through all layers
- Trim back to 10″ x 6″
- Prep the zipper sandwich
- Place 1 exterior piece right side up
- Lay zipper right side down along the top long edge
- Place 1 lining piece right side down on top
- Clip or pin in place
- Sew the first side of the zipper
- Sew along the top edge using a zipper foot (or regular foot)
- Flip fabrics open so exterior and lining are wrong sides together
- Press seam away from zipper
- Optional: topstitch 1/8″ from zipper
- Attach the other side of the zipper
- Repeat zipper sandwich on the other side:
- Exterior right side up
- Zipper right side down
- Lining right side down
- Sew, flip, press, and optional topstitch
- Repeat zipper sandwich on the other side:
- Open the zipper partway
- Open zipper halfway for turning later
- Sew around the pouch
- Place exteriors right sides together
- Place linings right sides together
- Stitch around entire rectangle with 1/4″ seam
- Leave a 3–4″ gap in the lining bottom for turning
- Box the corners
- Pinch each corner so side seam and bottom seam align
- Measure 1″–1.5″ from tip and draw a line
- Sew across the line and trim excess
- Repeat for 2 exterior corners + 2 lining corners
- Larger measurement = deeper pouch
- Turn and finish
- Turn pouch right side out through lining gap
- Gently push out corners
- Stitch lining gap closed (machine or hand)
- Tuck lining inside pouch
- Lightly press the top edge
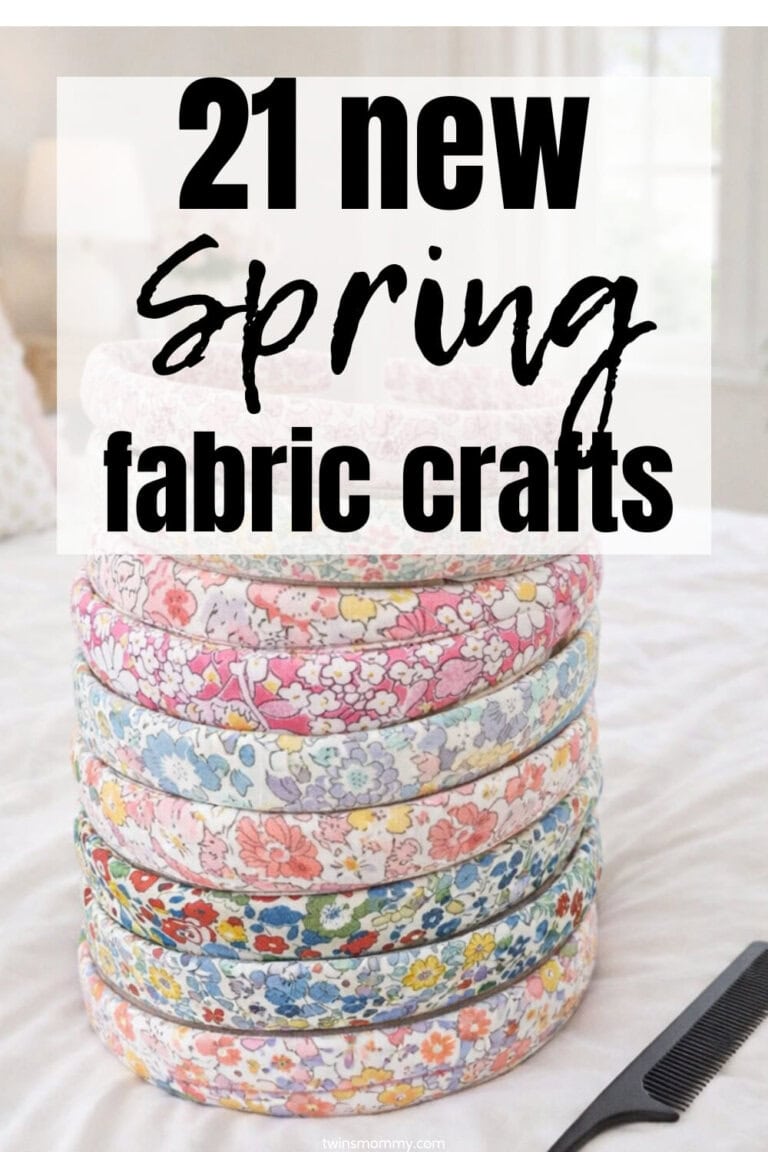
6. Fabric Headbands
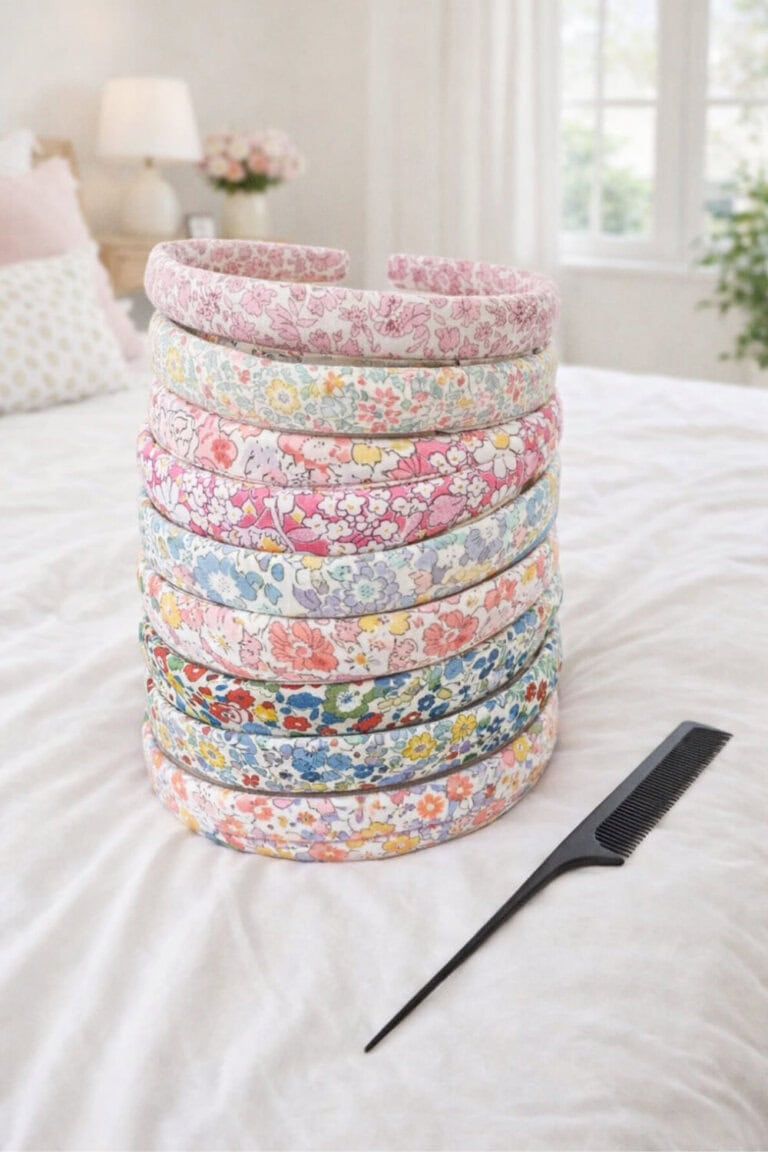
Aren’t these a stylish new spring fabric craft idea? I know my daughter would love these to wear for school!
Materials you need:
- Headband base (either a plain plastic headband or a padded headband form)
- Quilting cotton fabric (floral prints like in your photo)
- Fusible fleece / quilt batting (for the padded look)
- Lightweight interfacing (optional, helps the fabric stay smooth)
- Hot glue gun + glue sticks or fabric glue (sewing optional)
- Needle + thread (matching thread if you want to stitch)
- Scissors or rotary cutter + ruler
- Clips or clothespins
- Iron + ironing board
- 1/4″–3/8″ ribbon or extra fabric strip (to finish the underside)
- Fray Check (optional
Cutting (for 1 headband):
- Cut 1 fabric strip: ~16″–18″ long x 2.5″–3″ wide (adjust width depending on how thick you want it)
- Cut 1 fusible fleece/batting strip: same length, but slightly narrower (about 1/4″ less on both sides)
- Cut 1 underside finishing strip (ribbon or fabric): 16″–18″ x 1″–1.25″
- Measure the headband length (end to end) and use that to confirm your strip length (you want a little extra to wrap the ends).
- Fuse the padding: iron fusible fleece/batting onto the wrong side of your main fabric strip (center it so edges stay less bulky).
- Fold and press: fold the strip in half lengthwise, right sides together, and press a crisp fold.
- Sew the tube (or glue):
- Sew along the long edge with a 1/4″ seam to create a tube, leaving ends open.
- No-sew option: glue the long edge instead, keeping glue very close to the edge so it doesn’t seep through.
- Turn right-side out: use a safety pin or turning tool, then press the seam so it sits neatly along the underside.
- Wrap the headband:
- Add a thin line of glue along the top of the headband and press the fabric tube on, working in small sections.
- Pull gently as you go so the fabric stays smooth and snug.
- Finish the underside:
- Glue your ribbon/finish strip down the inside/underside of the headband to cover the seam and raw edges.
- Press and clip until set.
- Neaten the ends:
- Tuck raw fabric ends inward at both tips and glue shut.
- Optional: add a tiny felt tab inside each end for a clean finish and comfort.
- Final press + check: quick press (careful around glue) and trim any stray threads.
Quick tips to match the “store-bought” look
- Keep padding slightly narrower than the fabric so the edges don’t look puffy.
- Work in 1–2 inch glue sections so you can smooth wrinkles before it sets.
- If the fabric is slippery, add lightweight interfacing before padding for extra control.
7. Fabric Bookmarks
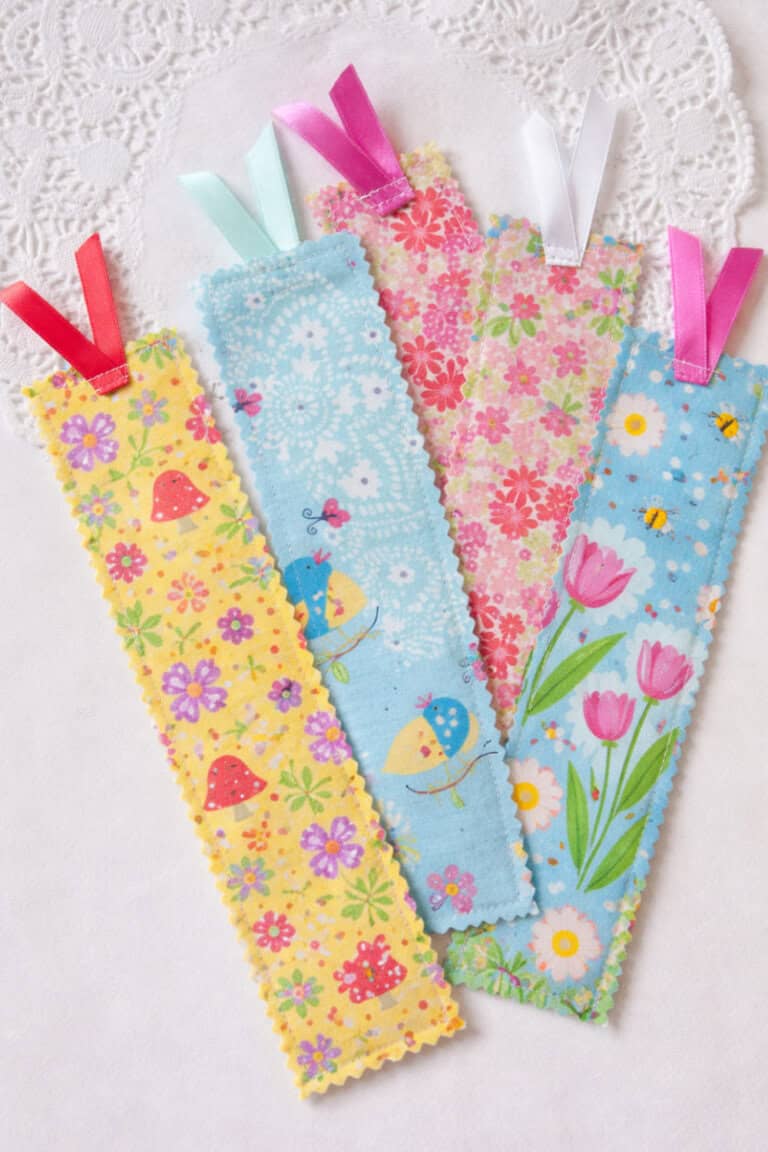
These spring fabric bookmarks are a quick, cheerful sewing project that uses up small fabric scraps and makes the cutest handmade gift for book lovers or a fun afternoon craft.
Materials:
- Cotton fabric scraps (spring prints work best)
- Lightweight fusible interfacing or felt
- Ribbon (⅜”–½” wide)
- Thread (matching or neutral)
- Sewing machine or hand-sewing needle
- Fabric scissors or pinking shears
- Iron
- Pins or clips
- Ruler
1. Cut the fabric
- Cut 2 rectangles per bookmark: about 2½” x 7″
- Cut 1 matching rectangle of interfacing or felt the same size
2. Prep the ribbon
- Cut ribbon pieces 4–5 inches long
- Fold each ribbon in half to form a loop
3. Layer the bookmark
- Place the two fabric pieces right sides together
- Sandwich the folded ribbon loop at the top edge, raw edges aligned
- Place interfacing or felt on the outside of one fabric piece
4. Sew
- Stitch around all sides using a ¼” seam allowance
- Leave a small opening at the bottom for turning
5. Turn and press
- Turn bookmark right side out
- Use a blunt tool to push out corners
- Press flat with an iron
6. Topstitch
- Topstitch around the entire bookmark to close the opening and secure the ribbon
- Optional: stitch close to the edge for a clean, finished look
7. Trim edges (optional)
- Use pinking shears for a decorative edge, or leave straight for a simple finish
8. Fabric Dish Towels
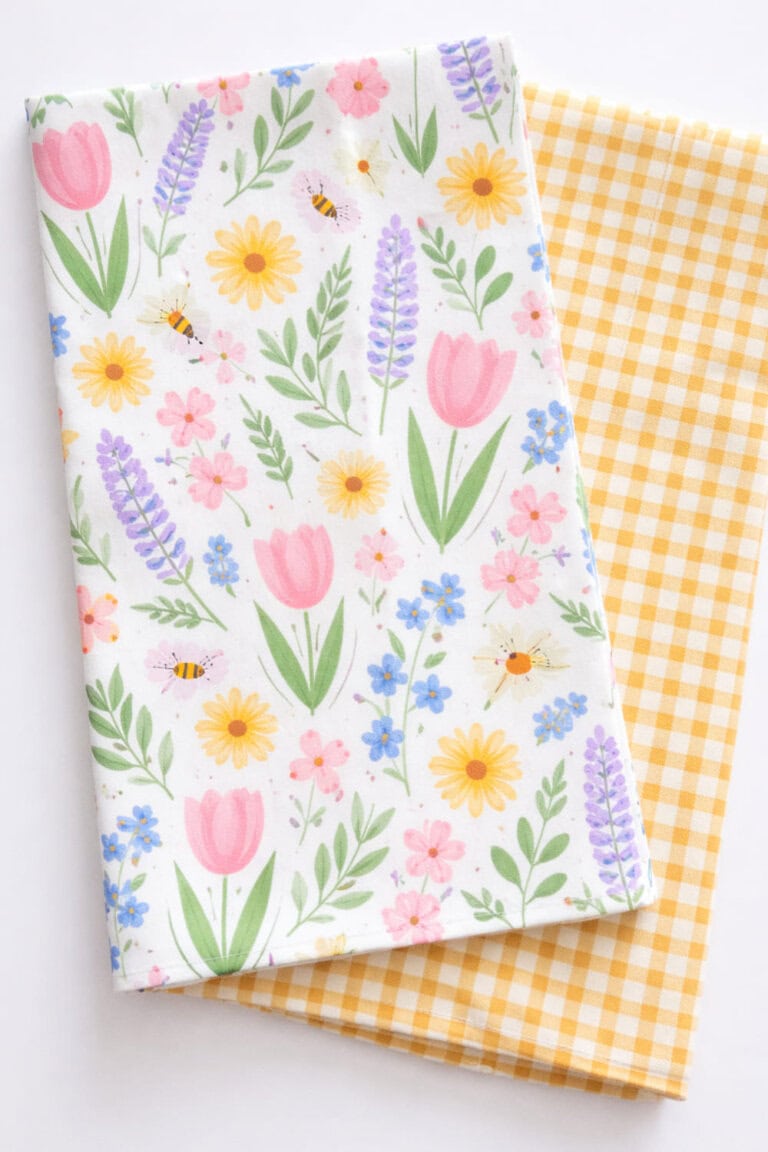
Freshen up your kitchen for spring by sewing simple cotton dish towels with pretty floral and gingham prints.
Materials you’ll need
- Quilting cotton fabric (or linen/cotton blend), 1 yard makes 2–3 towels
- Absorbent backing (optional but recommended): cotton terry cloth OR waffle weave (same size as your towel pieces)
- Coordinating thread
- Fabric scissors or rotary cutter + mat
- Ruler or measuring tape
- Pins or sewing clips
- Iron + ironing board
- Sewing machine
- Turning tool (chopstick, blunt knitting needle, or point turner)
Optional
- Topstitching needle (90/14) if sewing thicker terry/waffle
- Hanging loop: 4–6″ strip of twill tape or folded fabric
- Fabric marker/chalk
- 1) Choose your towel size + cut fabric
- Pick one:
- Classic towel: 18″ x 28″
- Slightly smaller: 16″ x 26″
- Cut:
- Front (spring print): 1 rectangle in your chosen size
- Back (optional absorbent layer): 1 rectangle same size (terry or waffle)
- For single-layer towels, cut only the front piece.
- Pick one:
- 2) Pre-wash + press
- Pre-wash and dry fabric to prevent shrinking.
- Press flat so edges line up cleanly.
- 3) Add a hanging loop (optional)
- Fold twill tape or fabric strip in half.
- Place raw ends at the top center, loop facing inward.
- Baste in place close to the edge.
- 4) Stack and pin
- For 2-layer towels:
- Place fabrics right sides together.
- Pin or clip all around.
- For terry cloth:
- Place terry against the cotton right side.
- Use extra clips since terry shifts.
- For 2-layer towels:
- 5) Sew around the edges
- Sew with a 1/2″ seam allowance.
- Leave a 4–5″ turning gap along the bottom edge.
- 6) Trim + clip corners
- Trim seam allowance slightly.
- Clip corners diagonally without cutting stitches.
- 7) Turn right side out + press
- Turn through the gap.
- Push corners out neatly.
- Press edges flat, folding the turning gap inward.
- 8) Topstitch to finish
- Topstitch around the towel 1/8″–1/4″ from the edge.
- This closes the gap and gives a clean finish.
- 9) Make it extra durable (optional)
- Add a second line of stitching about 3/8″ from the edge.
- Stitch an “X” at the hanging loop for extra strength.
9. Fabric Painted Tote Bag
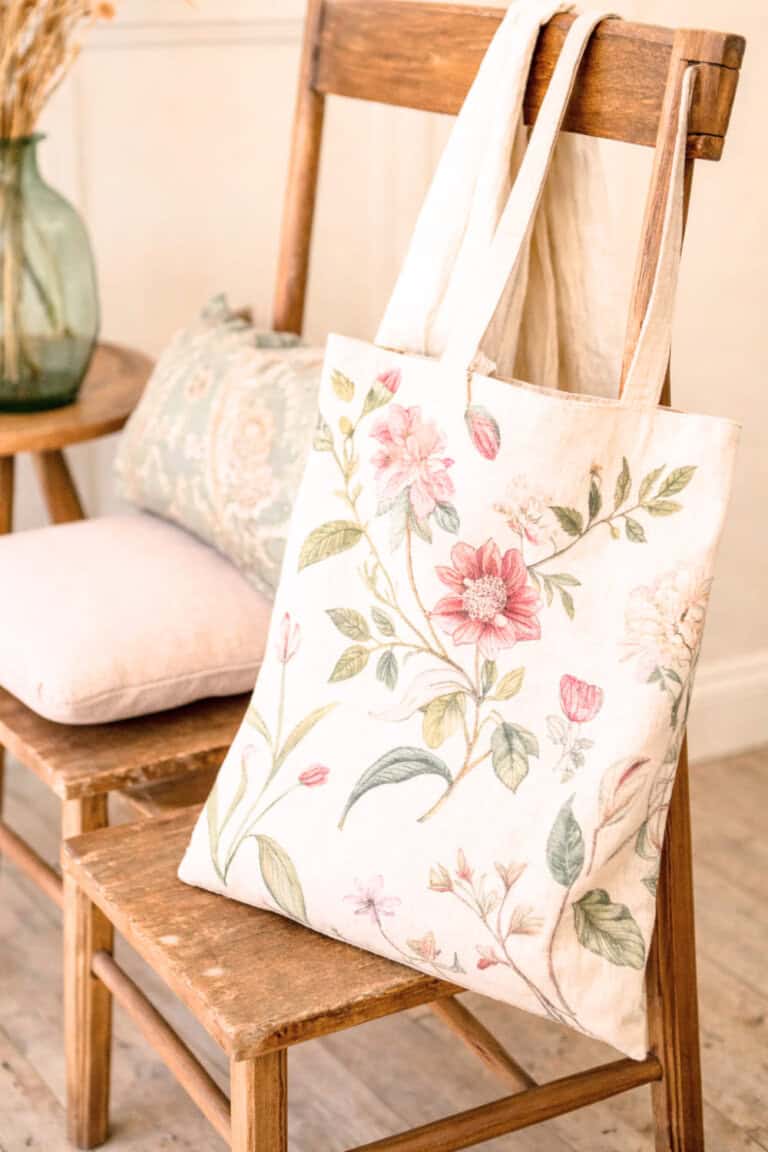
Here’s a simple way to sew this tote bag and paint the vintage floral design on it using your stencil + muted acrylics + fabric brushes.
Materials (sewing):
Fabric
- 1/2 yard (45″ wide) linen, linen-cotton, canvas, or cotton duck (outer)
- 1/2 yard cotton (optional lining)
- Optional: fusible interfacing (medium weight) for a sturdier bag
Notions
- Matching thread
- Fabric scissors or rotary cutter + mat
- Ruler/tape measure + marking pen/chalk
- Pins/clips
- Sewing machine (or hand-sewing needle if needed)
- Iron + ironing board
Materials (painting):
- Vintage Floral Pattern Stencils (your set)
- Muted Color Acrylic Paint Set (your set)
- Fabric Paintbrush Set (your set) — detail brushes + a small flat brush
- Optional but helpful:
- Fabric medium (mix with acrylic so it stays flexible on fabric)
- Painter’s tape
- Cardboard/freezer paper (to put inside the bag while painting)
- Paper towels + water cup
- Heat source for setting paint (iron or dryer)
Cut list (finished tote approx. 14″ W x 15″ H):
Cut from outer fabric
- (2) Body panels: 15″ wide x 16″ tall
- (2) Handle strips: 4″ wide x 24″ long (for 1″ finished straps)
Optional lining fabric
- (2) Lining panels: 15″ wide x 16″ tall
Optional interfacing
- (2) Body pieces: 15″ x 16″
- (2) Handle pieces: 4″ x 24″
Want it taller/shorter? Keep the width the same and adjust the height—easy.
Step-by-step: Sew the tote bag
1) Prep + reinforce (optional but recommended)
- Fuse interfacing to the wrong side of the outer body pieces (and handle strips if you want thicker straps).
2) Make the handles (clean, sturdy straps)
- Take one handle strip (4″ x 24″).
- Fold it in half lengthwise, press.
- Open it back up, fold both long edges into the center crease, press.
- Fold again along the center crease (you now have a long, neat strap).
- Topstitch down both long edges.
- Repeat for the second strap.
3) Create the outer bag
- Place the two outer body panels right sides together.
- Sew both sides and bottom with a 1/2″ seam allowance.
- Trim threads and press seams open or to one side.
4) Box the corners (this gives the tote a “base”)
- Turn the bag wrong-side out.
- Pinch one bottom corner so the side seam and bottom seam line up (makes a triangle).
- Measure 2.5″ across the triangle (from point to point), draw a line.
- Sew across that line.
- Repeat for the other corner.
- Trim the triangle tips (leave about 1/4″ beyond your seam).
5) Add lining (optional, but makes it look finished)
- Sew the lining panels right sides together on sides + bottom.
- Box corners the same way.
- Leave a 4″ turning gap on the lining bottom seam.
6) Attach handles
- Turn the outer bag right-side out.
- Mark 4 handle points along the top edge:
- Place each strap end about 3.5″–4″ in from the side seam.
- Pin straps with the strap ends aligned to the top raw edge (strap loop hanging down into the bag).
- Baste straps in place with a quick stitch.
7) Join outer + lining
- Turn the lining wrong-side out.
- Put the outer bag inside the lining (right sides facing).
- Match side seams and pin around the top edge.
- Sew around the top edge with a 1/2″ seam.
8) Turn + finish
- Pull the whole bag right-side out through the lining gap.
- Sew the lining gap closed (machine or hand stitch).
- Push lining into bag, press the top edge crisp.
- Topstitch around the top edge (this also strengthens the handles).
Step-by-step: Paint the vintage floral pattern
1) Prep the bag surface
- Wash and dry the tote first (removes sizing so paint adheres better).
- Iron it flat.
- Slide cardboard/freezer paper inside the bag so paint doesn’t bleed through.
2) Plan placement (quick layout)
- Lay your stencil on the tote and try a few positions.
- Use a bit of painter’s tape to hold it in place.
- Lightly mark placement with chalk if needed.
3) Mix paint for fabric (important if using acrylics)
- If you have fabric medium: mix 1 part fabric medium : 1 part acrylic.
- This helps the paint stay soft and not crack.
- If you don’t have fabric medium:
- Use thin layers of paint and avoid thick “puddles.”
4) Base layers first (big shapes)
- Use a small flat brush or stencil brush.
- Dip lightly, blot on paper towel (you want almost-dry paint for crisp stencil edges).
- Tap/stipple the paint over the stencil openings.
- Start with lighter colors (muted blush, dusty rose, soft sage).
5) Build the “vintage” look (shading + dimension)
After you remove the stencil (or shift it), add these details freehand with your fabric paintbrush set:
Petals
- Add slightly darker tone near the center of the flower.
- Feather outward with a small detail brush for soft shading.
Leaves
- Paint a muted green base.
- Add a deeper green along one edge + a faint vein down the middle.
Stems
- Thin, slightly uneven lines look more botanical and vintage.
- Mix a muted olive + a touch of brown for an aged tone.
6) Keep it soft and not “cartoony”
- Use watered-down paint (or more fabric medium) for translucent layers.
- Layer 2–3 light coats instead of one heavy coat.
- Add tiny imperfections—slight variation is what makes it look “printed on linen.”
7) Let it dry fully
- Dry flat for at least 24 hours.
8) Heat-set the paint (so it lasts)
- Place a pressing cloth over the painted area.
- Iron on medium heat (no steam) for 3–5 minutes, moving constantly.
- Or tumble dry on medium heat for 30–40 minutes (if your paint instructions allow).
9) First wash rules
- Wait 72 hours before washing if possible.
- Wash inside out, cold water, gentle.
- Line dry to keep the paint looking clean longer.
10. Fabric Tea Cozy
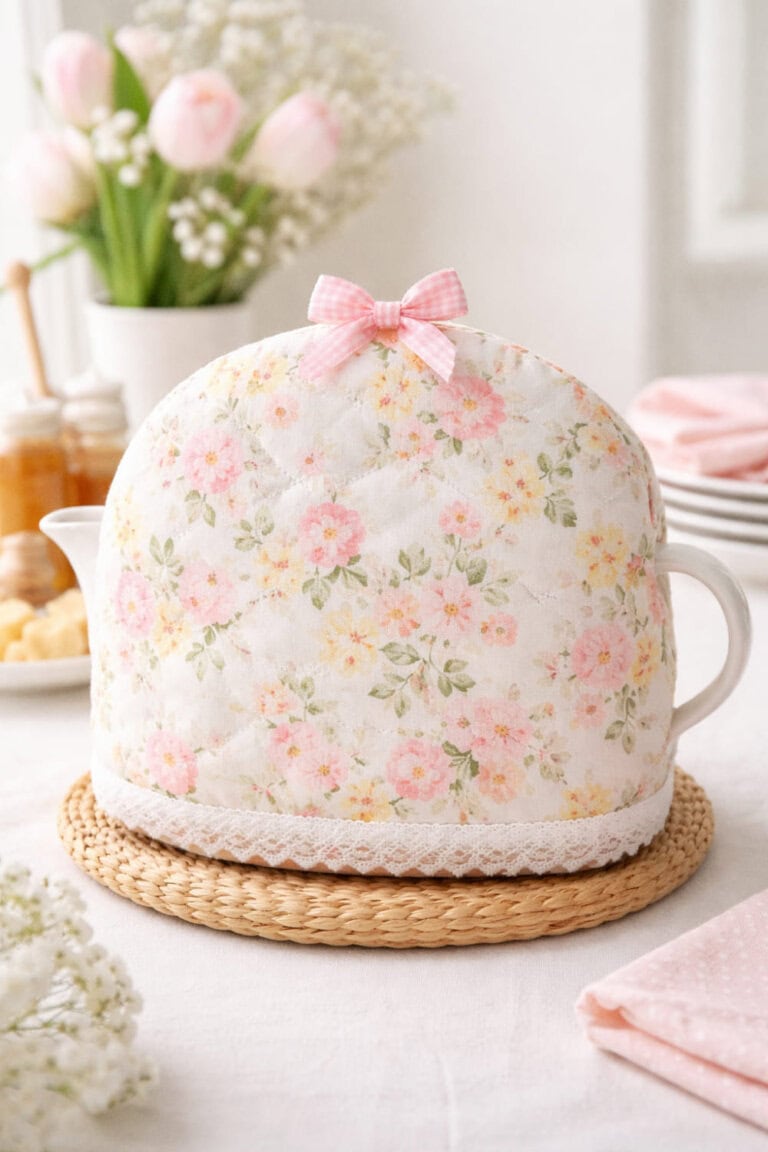
I love this project because it feels classic, cozy, and very spring without being complicated.
This fabric tea cozy is one of those gifts that looks impressive but comes together in an afternoon, which makes it perfect when I want to make something thoughtful without overthinking it.
Materials You’ll Need
- 2 pieces of cotton fabric (about 10 x 14 inches each)
- 1 piece of batting (same size as your fabric pieces)
- Sewing machine or needle and thread
- Fabric scissors
- Pins or clips
- Iron and ironing board
- Optional trim like lace, ribbon, or a small fabric bow
- Create the cozy shape
You start by stacking your two fabric pieces right sides together with the batting on top. You trace a simple dome shape that will fit over your teapot, leaving a flat bottom edge so it sits nicely on the table. - Cut and pin the layers
You cut through all layers at once so everything matches up perfectly. You pin around the edges to keep the fabric and batting in place while sewing. - Sew the cozy together
You stitch around the curved edges, leaving the bottom edge open. You keep your seam allowance consistent so the cozy holds its shape. - Turn and press
You turn the cozy right side out through the bottom opening. You gently push out the seams and press everything flat with an iron for a clean finish. - Finish the bottom edge
You fold the bottom edge inward and sew a straight stitch across to close it. This helps the cozy sit snugly over the teapot. - Add decorative details
You finish by sewing on lace, ribbon, or a small bow at the top. This step is optional, but it gives the cozy that soft spring charm that makes it gift-ready.
More Easy Fabric Projects for Spring You Can Make
Check out some easy new spring crafts you can make and sell or just give for a gift.
11. Fabric Scrunchies
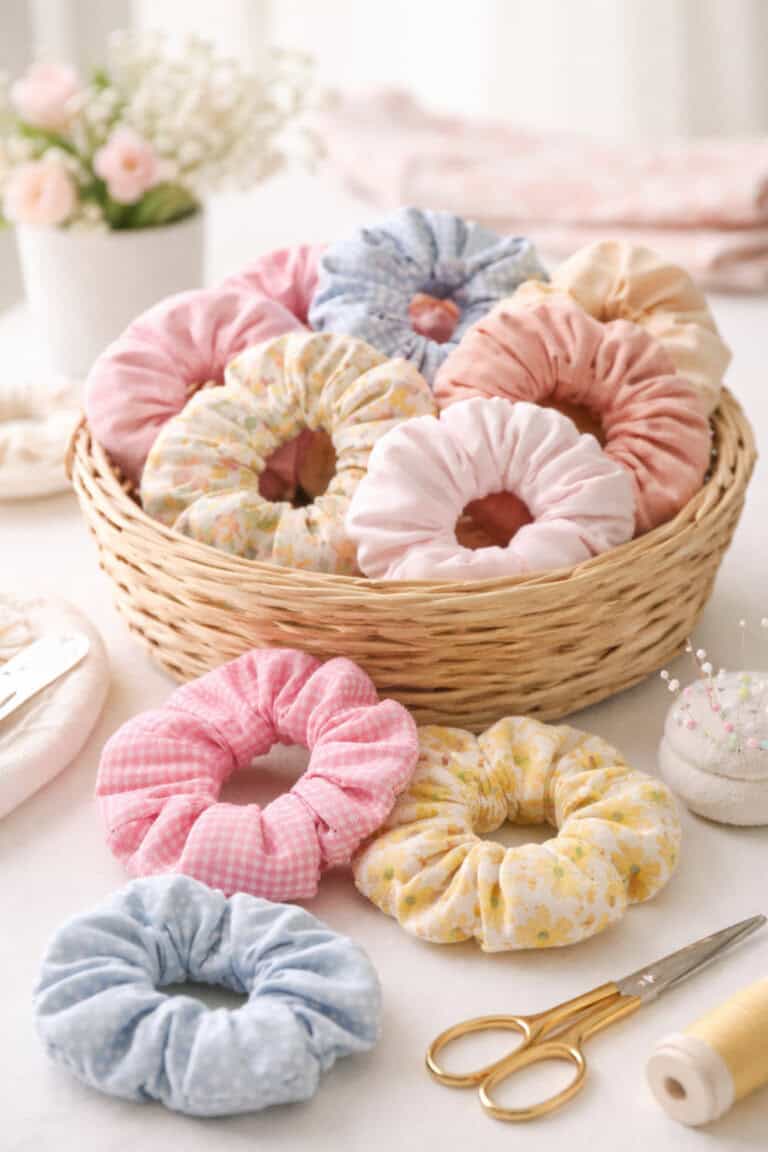
Fabric scrunchies are one of those spring crafts that feel fun, low-pressure, and instantly giftable.
You can mix floral prints with soft solids and use up fabric scraps without wasting anything.
To make them, you sew a long fabric strip into a tube, thread elastic through the center, and stitch the ends together before closing the opening.
Once you get the hang of it, you can make a whole matching set in one sitting and have the cutest handmade gifts ready to go.
12. Fabric Garland Decor
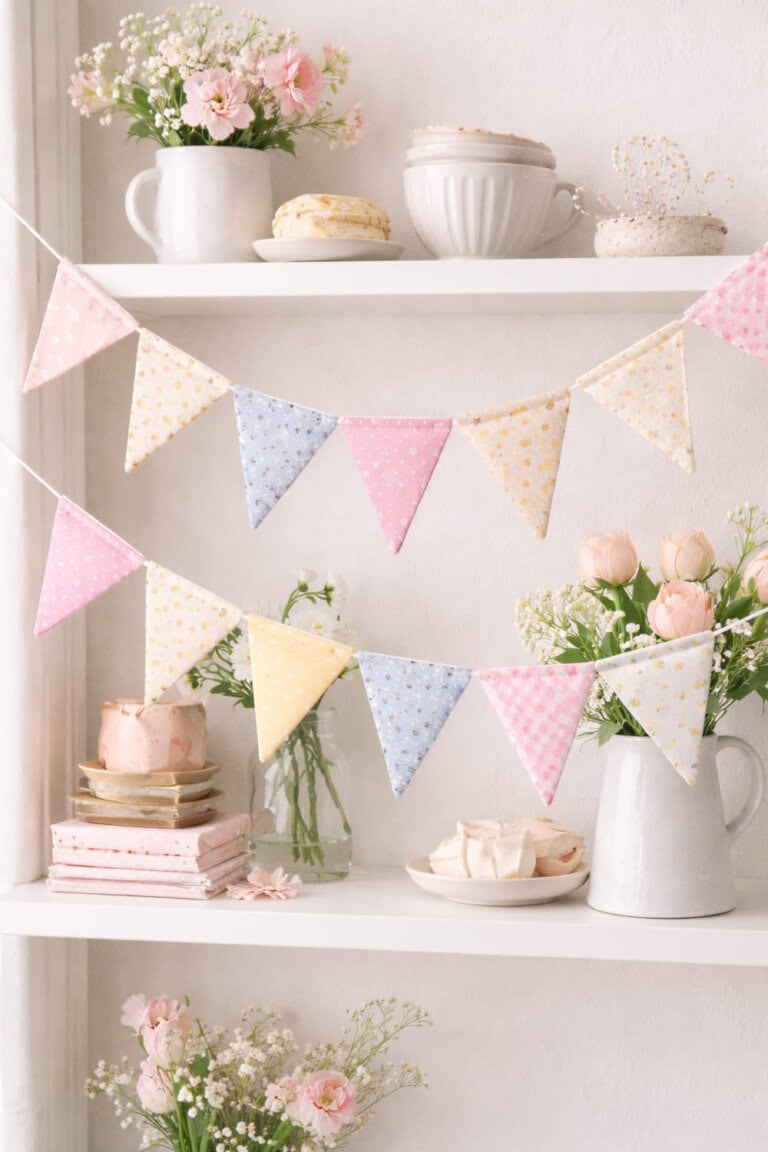
Fabric garland decor is one of those spring crafts that instantly makes a space feel lighter and happier.
I love how simple it is while still looking thoughtful enough to gift or use for seasonal decorating.
To make it, you cut fabric into triangles or soft shapes, sew or glue the edges for a clean finish, and string them onto twine or ribbon.
Once it’s done, you can hang it across shelves, windows, or mantels for an easy pop of spring color.
13. Fabric Catch-All Baskets
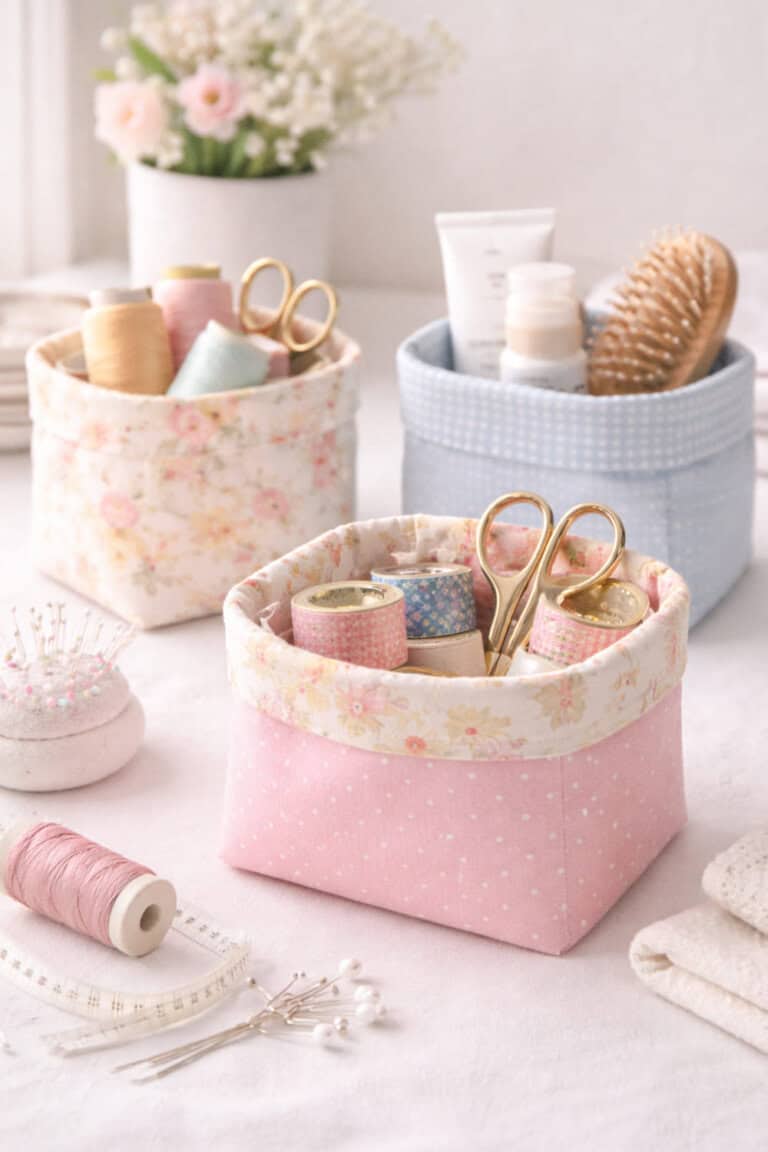
Fabric catch-all baskets are one of those spring crafts that feel both pretty and practical.
These are fun to make because they help organize everyday clutter while still looking soft and decorative on a shelf or counter.
To make them, you sew fabric panels with interfacing or batting inside so the basket holds its shape, then stitch the sides and fold the top edge for a clean finish.
These work beautifully as gifts and are perfect for holding keys, craft supplies, or bathroom essentials.
14. Fabric Plant Pot Covers
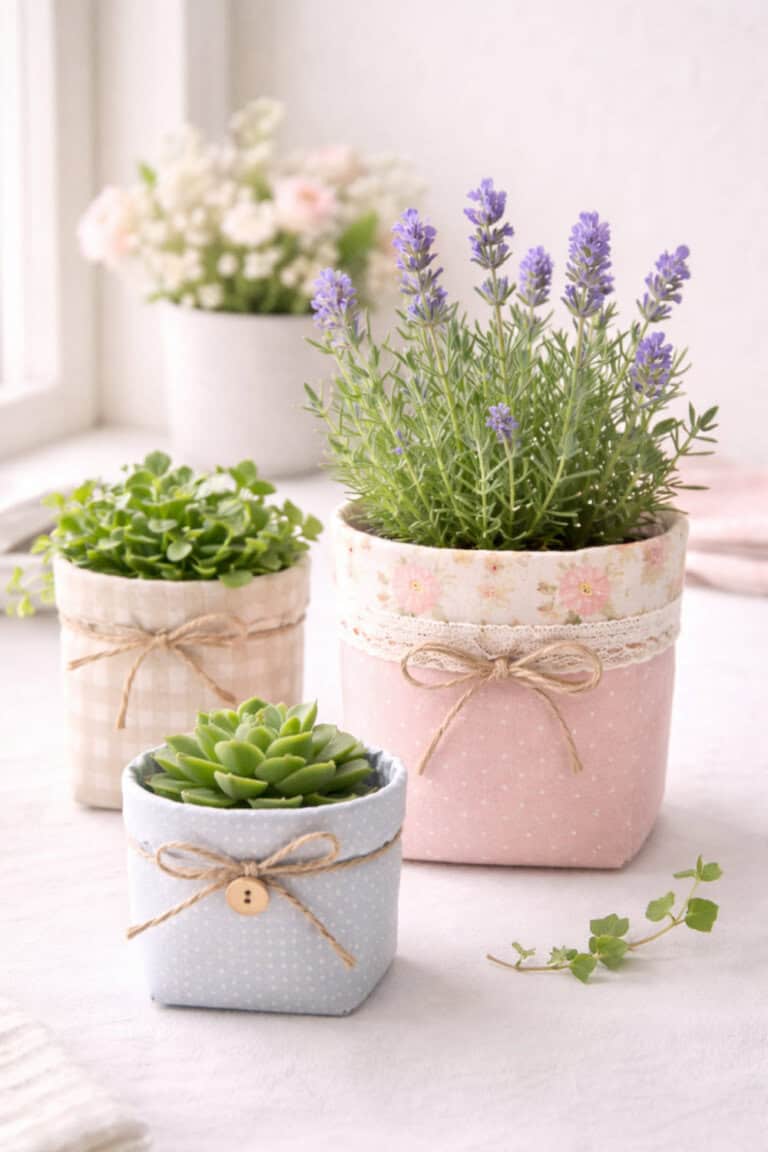
Fabric plant pot covers are one of my favorite spring crafts because they instantly make a simple plant feel gift-worthy.
You can use neutral fabrics or soft spring prints to match any home style without buying new planters.
To make them, you sew a fabric sleeve sized to your pot, add interfacing if you want more structure, and slip it right over the container.
Pair it with a small plant or herb, and you have an easy spring gift that feels thoughtful and fresh.
15. Fabric Jewelry Roll-Ups
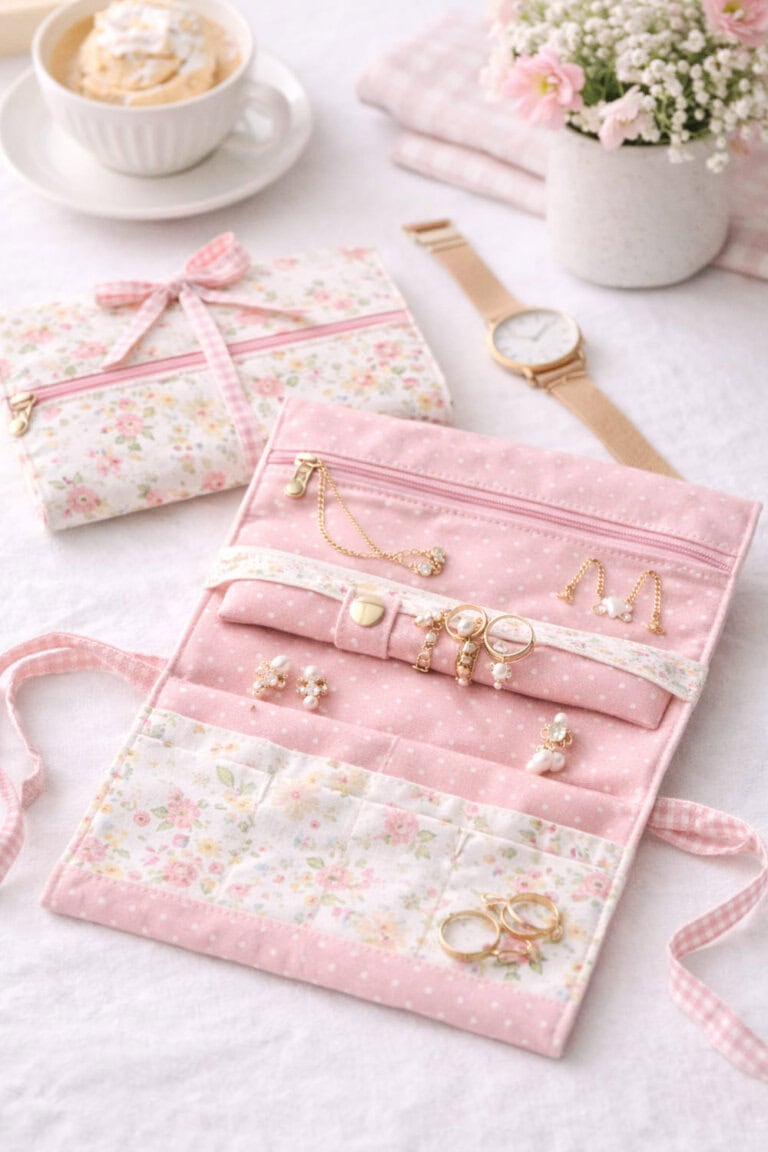
Fabric jewelry roll-ups are one of those spring crafts that feel thoughtful and useful at the same time.
These jewelry roll-up gifts are perfect because they’re lightweight, easy to customize with pretty fabrics, and perfect for travel or everyday storage.
To make one, you sew a flat fabric piece with small stitched pockets, add a soft lining for protection, and finish it with fabric ties so it rolls up neatly.
It’s a simple project that feels special and makes a beautiful handmade gift for anyone who loves accessories.
16. Fabric Doll Accessories
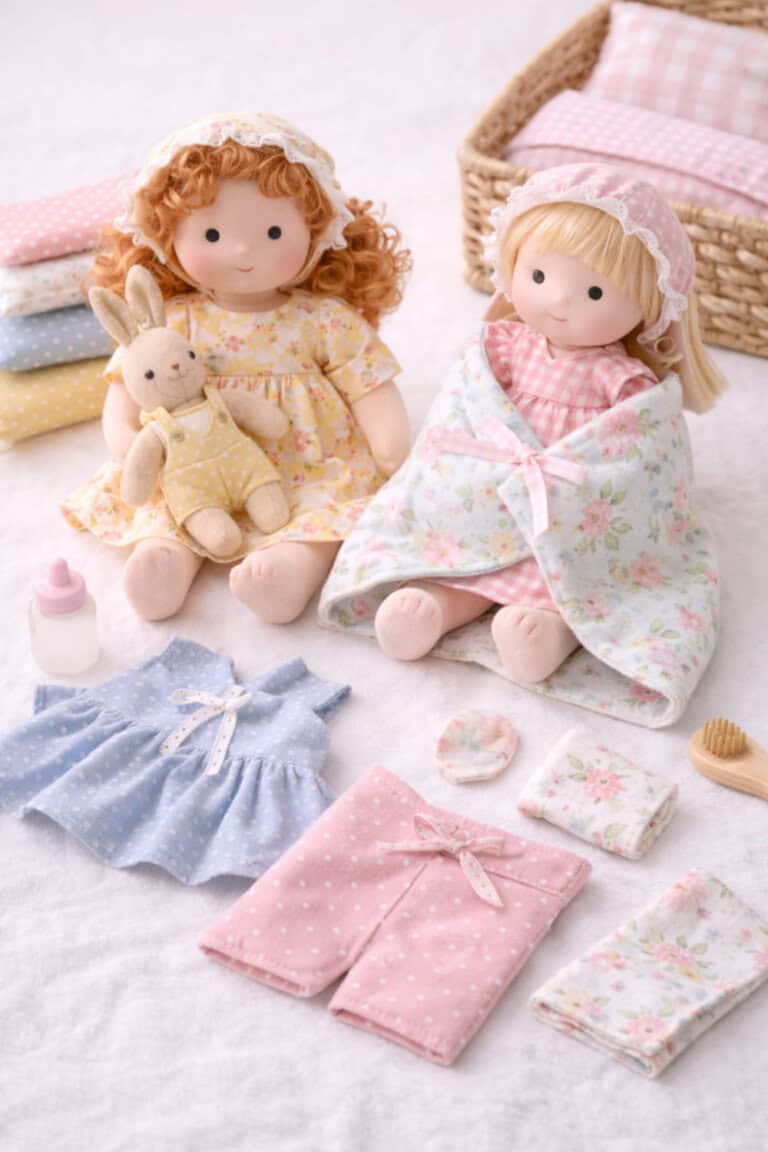
Fabric doll accessories are one of those spring crafts that feel extra special because they turn into keepsakes.
This spring craft is simple to make and uses leftover fabric scraps, which keeps it affordable and meaningful.
You sew small doll clothes or blankets using basic shapes and soft fabrics, focusing on easy fits instead of perfection.
My daughter would have absolutely loved these as a toddler, and that’s what makes them such a sweet handmade gift for little ones.
17. Fabric Mug Rugs
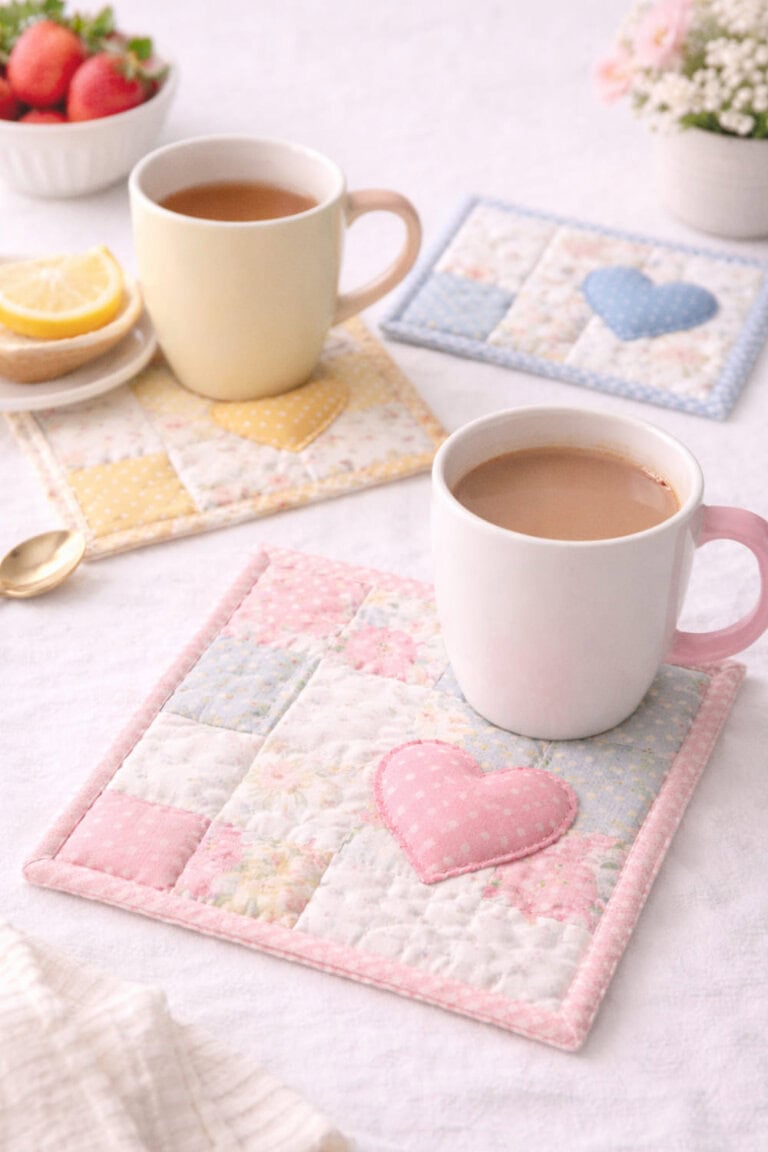
Fabric mug rugs are one of those spring crafts that feel cozy but still light and cheerful.
These are small, satisfying projects that let you play with pretty fabric combinations without committing to a big quilt.
To make them, you sew together small fabric squares with batting in the middle, quilt a few simple lines for texture, and finish the edges with binding or a stitched border.
They make perfect spring gifts for coffee or tea lovers and are easy to bundle as a set.
18. Fabric Keychains
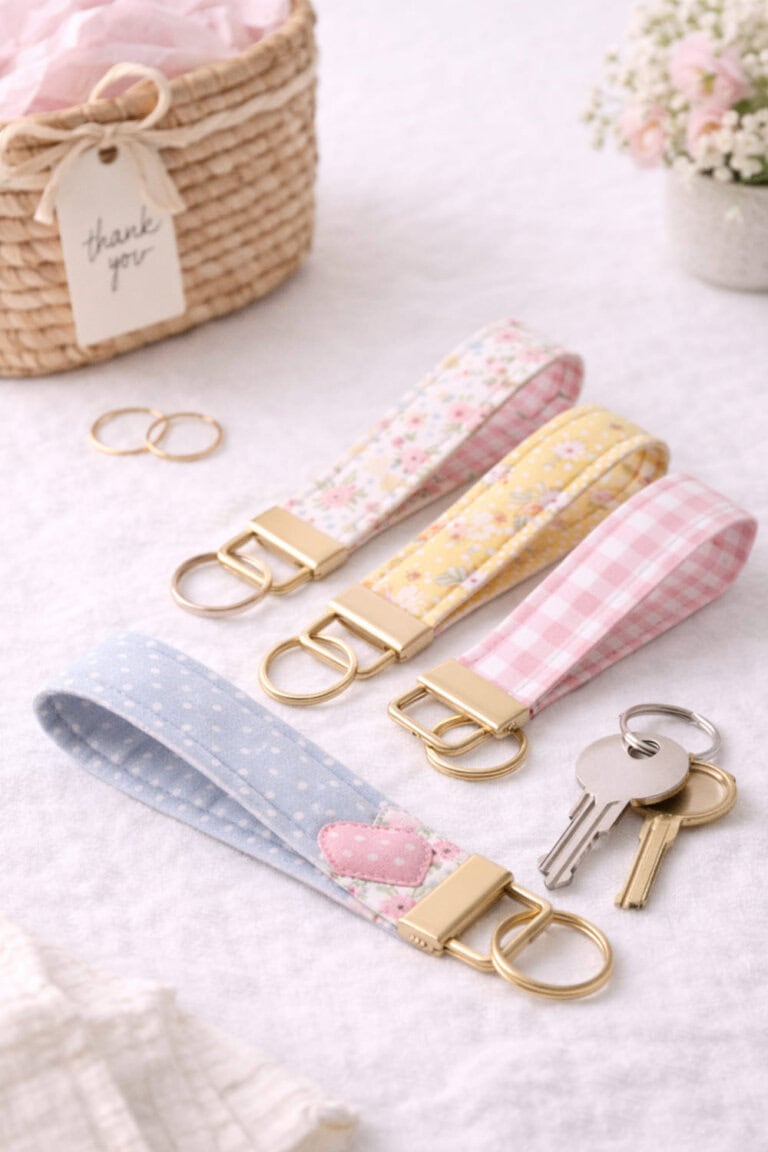
Fabric keychains are one of those spring crafts that feel small but end up being so useful.
You start by cutting short fabric strips, add interfacing to give them structure, then fold and sew them into sturdy loops.
Once the stitching is done, you attach keyring hardware, and suddenly you have a polished little piece that feels store-bought but still handmade.
They are perfect for using up spring fabric scraps and make easy gifts that work for teachers, friends, or tucked into a basket.
19. Fabric Wall Hangings
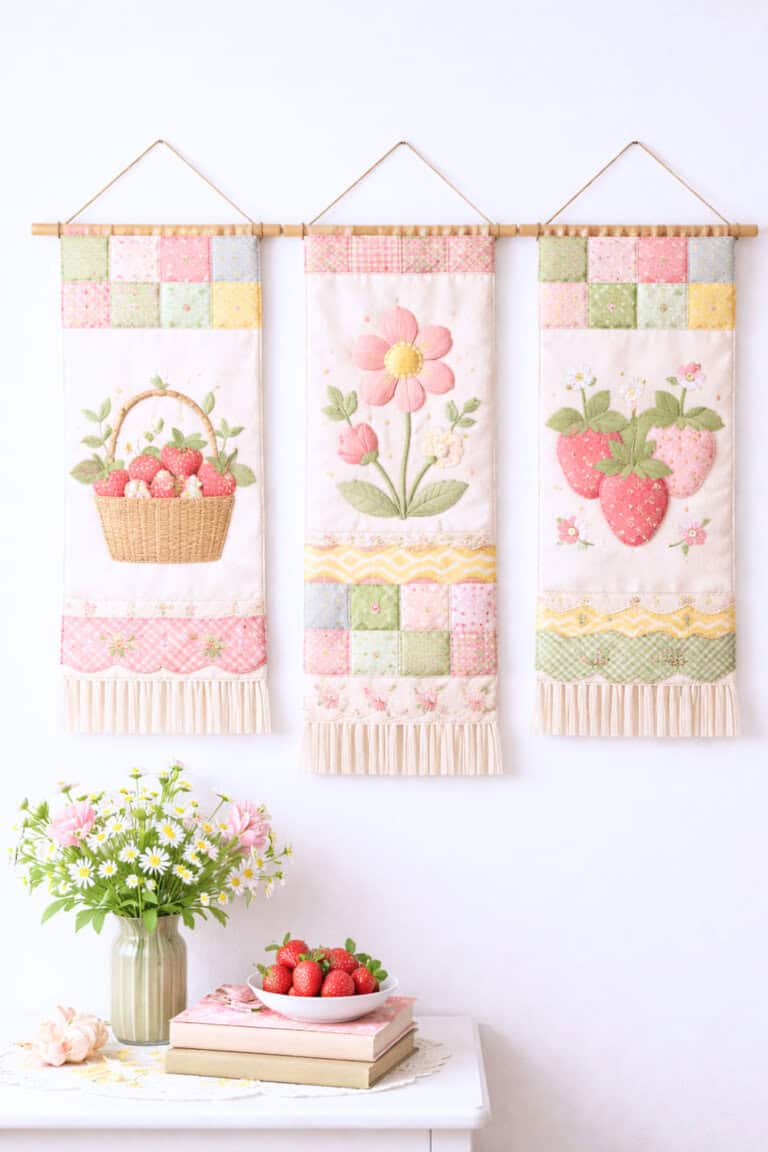
This fabric wall hanging is a relaxed spring project that lets you use soft colors and fabric scraps you already have.
You stitch or applique simple strawberry shapes onto a fabric panel, then finish it with a wooden dowel for easy hanging. It’s the kind of craft you can take your time with, making each piece feel personal.
Once it’s up, it adds a cozy, handmade touch that works in bedrooms, craft rooms, or entryways.
20. Fabric Aprons
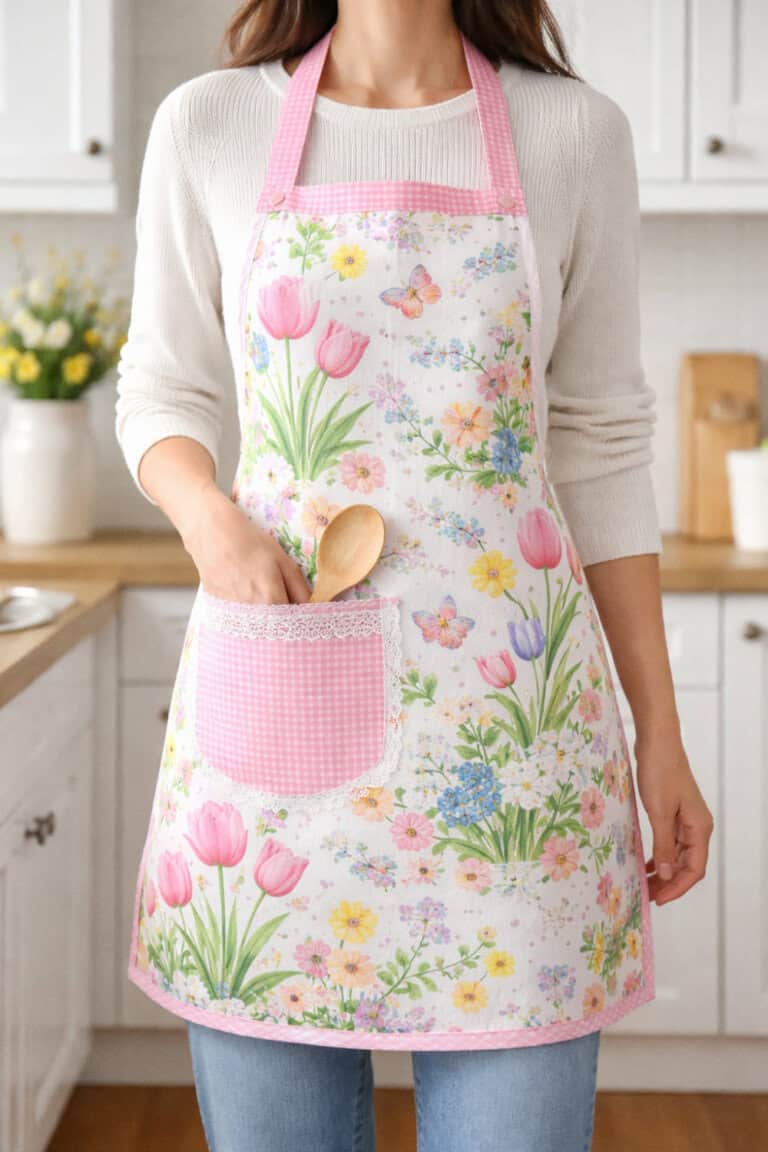
This spring fabric apron is a simple sewing project that’s both practical and pretty.
You start with a lightweight cotton fabric in a soft floral or pastel print, then cut a basic apron shape with ties for the neck and waist.
Adding a front pocket is optional but useful for holding utensils or tools while you work.
It’s an easy way to practice straight seams and create something you’ll actually use all season long.
21. DIY Fabric Butterflies
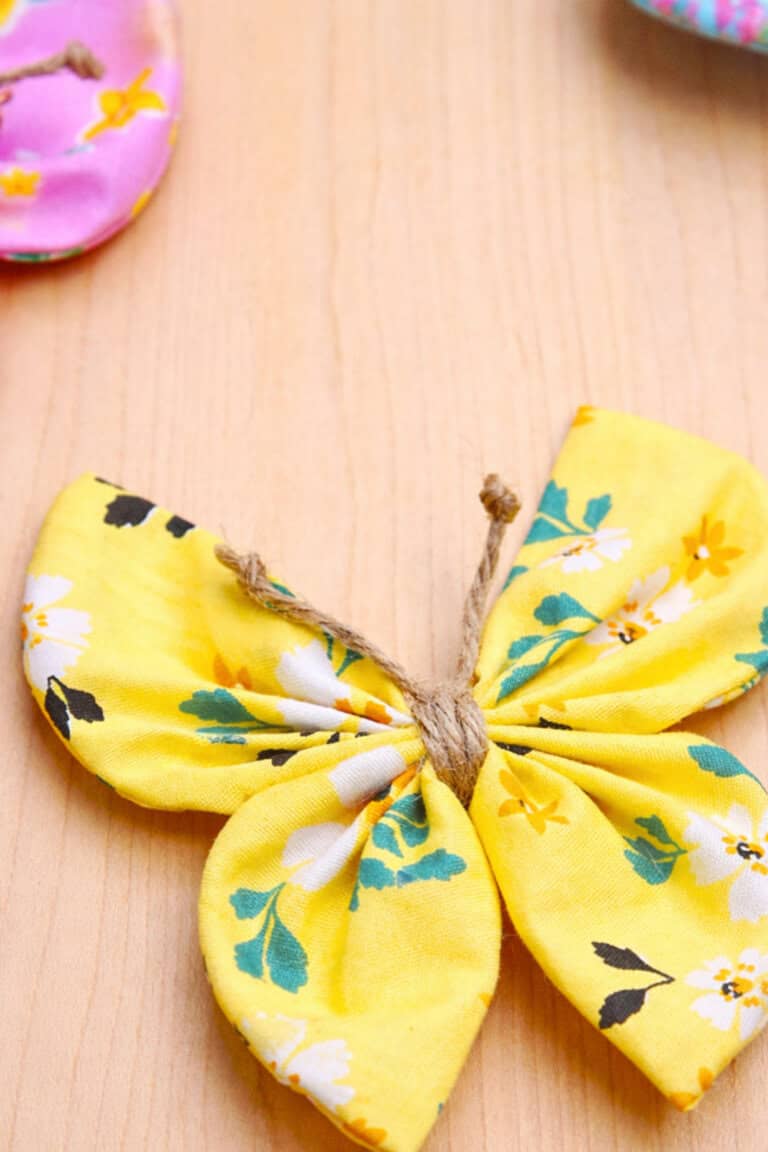
To make this fabric butterfly, cut two matching butterfly wing shapes from cotton fabric.
Pinch the fabric at the center and fold it accordion-style to create the wing shape.
Wrap twine tightly around the center a few times, knot it securely, and leave short ends for the antennae.
Adjust the folds until the wings look balanced and full.
Easy Spring Fabric Crafts For You to Make Today!
I hope you find these spring fabric crafts a fun idea to make on your spare time!
I know for me, I love to knit but my daughter loves to make things with scraps of fabric.
I’m sure she’ll want to make some headbands or other little things this season!


Leave a Reply